1. Welcome to OS Migrate
OS Migrate provides a framework and tool suite for exporting and importing resources between clouds. It is a collection of Ansible playbooks that provide the base functionality, and you can craft custom playbooks from the OS Migrate roles and modules as building blocks.
OS Migrate supports two migration paths:
-
Migrating virtual machines from VMware to OpenStack, using the
os_migrate.vmware_migration_kitcollection. -
Migrating workloads and resources between OpenStack clouds, using the
os_migrate.os_migratecollection.
OS Migrate uses the official OpenStack API and does not use direct database access or other methods to export or import data. The Ansible playbooks are idempotent: if a command fails, you can retry it with the same command.
This documentation is organized into two guides that share a common reference:
2. Migrating virtual machines from VMware to OpenStack
Use the VMware Migration Kit (os_migrate.vmware_migration_kit) Ansible collection to migrate virtual machines from VMware vSphere environments to OpenStack. The migration process includes discovery, pre-migration preparation, and migration execution phases. You can perform migrations from the command line or through AWX (or Ansible Automation Platform) for automation and orchestration.
2.2. Migration tools and workflows
Use the VMware Migration Kit (os_migrate.vmware_migration_kit) Ansible collection to deploy an OpenStack instance in the destination cloud as a conversion host and configure the prerequisites in the destination cloud. You can gather information about the source cloud by using the VMware community collection.
The following are the different phases of migration:
-
The discovery phase when you analyze the VMware source environment and collect data for the migration.
-
The pre-migration phase when you make the destination cloud ready to accept the migration. You can configure your conversion host, the required network, and other configurations, as necessary.
-
The migration phase.
To migrate your VMs, you can use the nbdkit server with a conversion host. You can configure the workflows with Ansible boolean variables. You can run the migration in a single cycle with minimal downtime if you use VMware’s change block tracking (CBT) option.
2.2.1. Migration workflows
There are different ways to run the migration from VMware to OpenStack:
-
The default is by using the nbdkit server with a Conversion hosts. This allows you to use the CBT option and approach near-zero downtime. It can also run the migration in one time cycle.
-
The second method is by using virt-v2v with a conversion host. You can use a conversion host already deployed or you can let the VMware Migration Kit deploy a conversion host for you.
-
A third method is available where you can skip the conversion host and perform the migration on a Linux machine. The volume migrated and converted will be uploaded as an OpenStack Image service (Glance) image or can be used later as a Cinder volume. This method is not recommended if you have large disks or a large number of VMs to migrate because the performance is slower than with the other methods.
All of these are configurable with Ansible boolean variables.
2.2.2. Migration workflow with nbdkit
The nbdkit migration workflow provides the most efficient data transfer path:

2.2.3. Migration workflow with Change Block Tracking
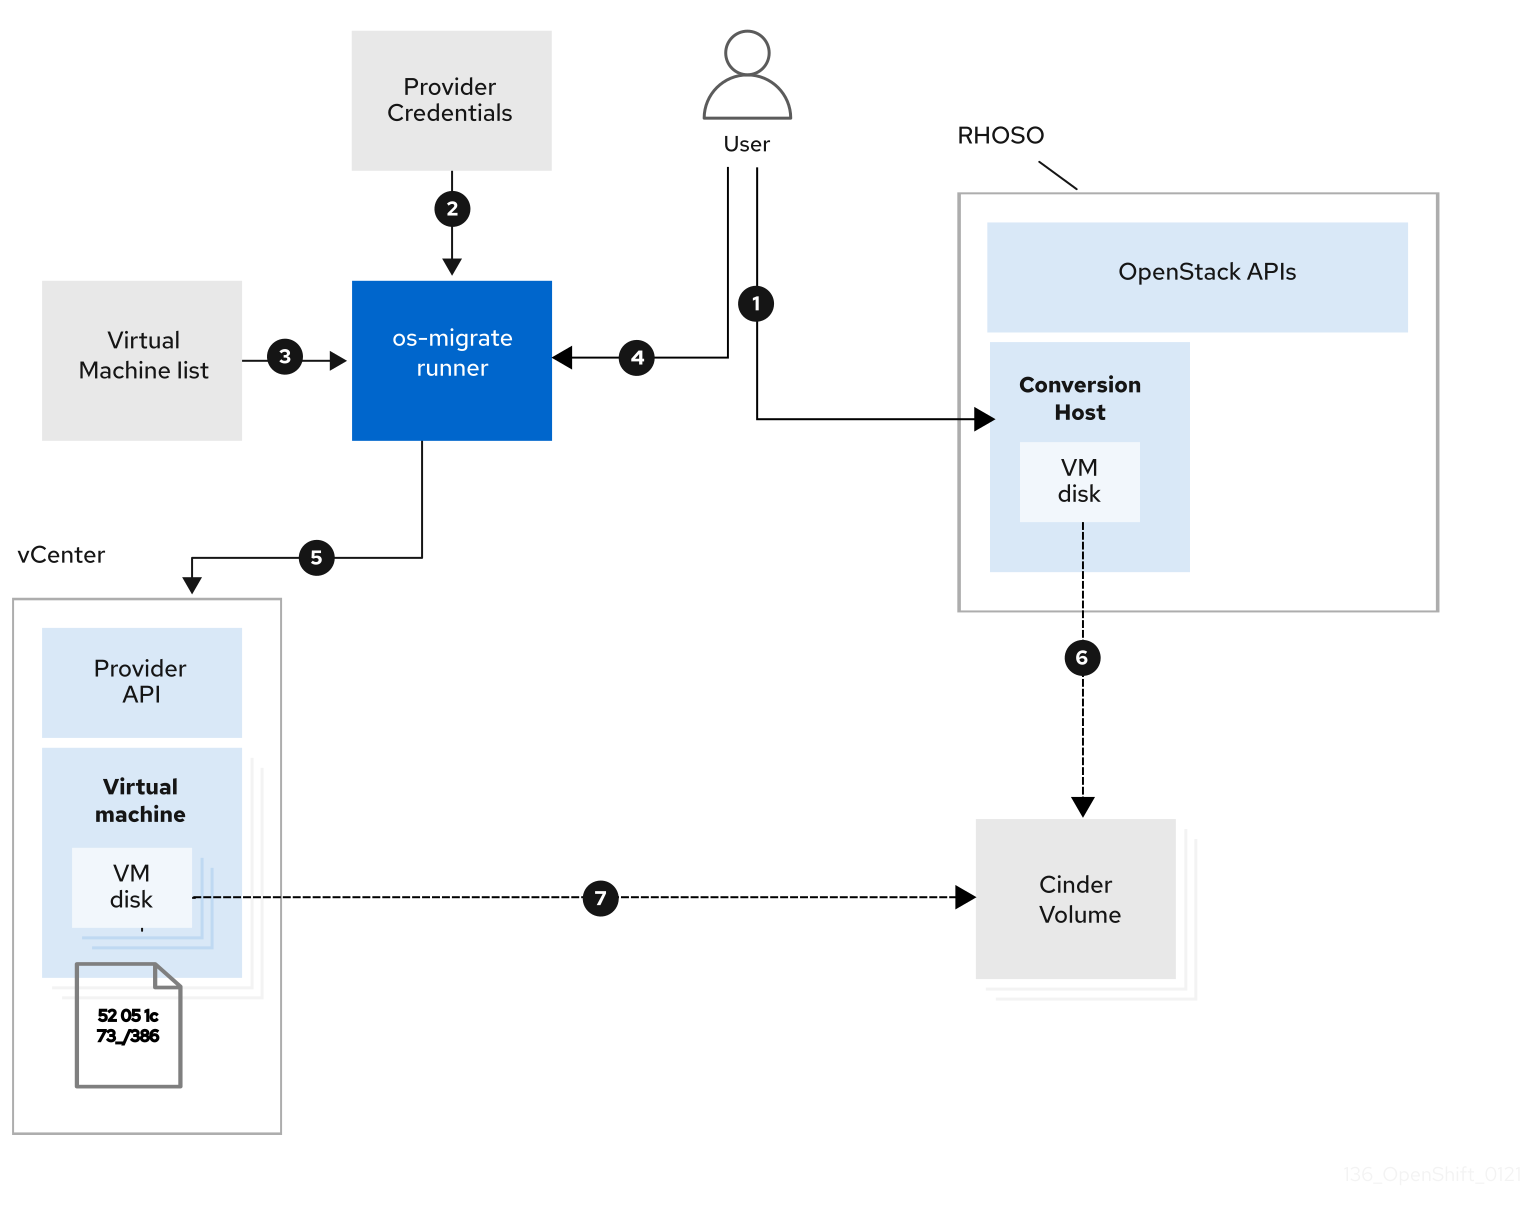
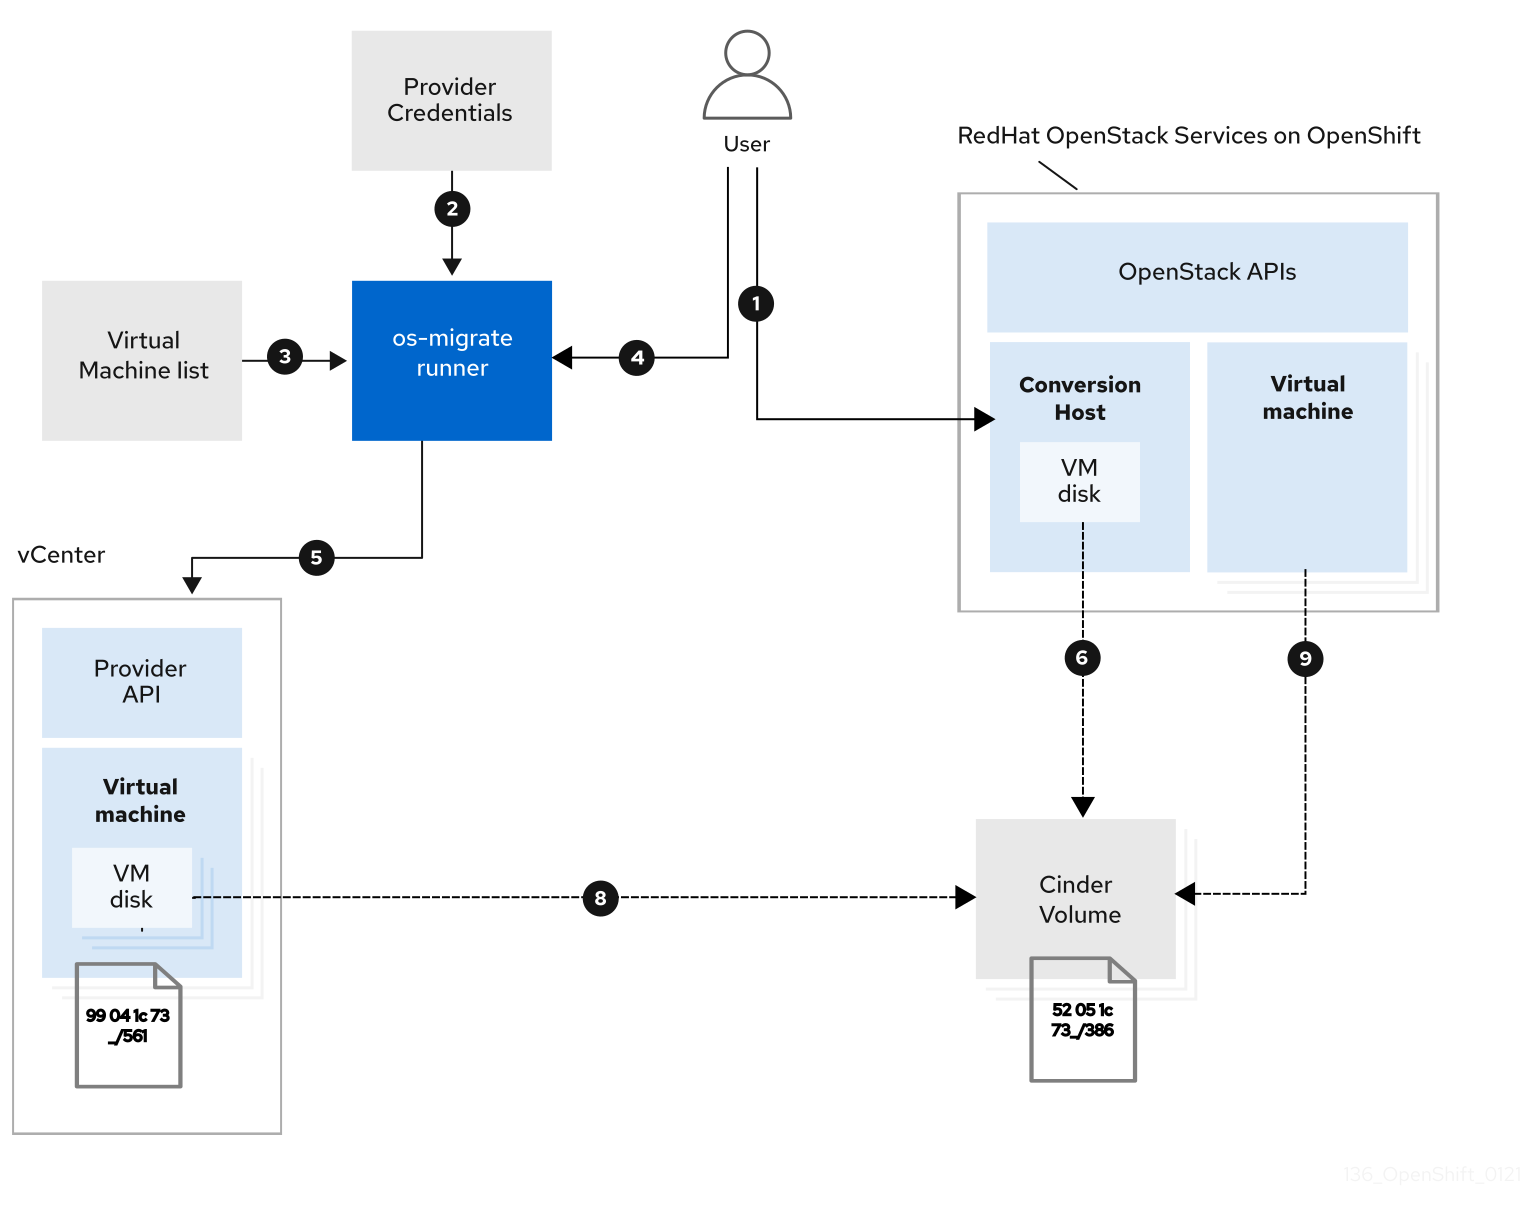
When using Change Block Tracking (CBT), the migration occurs in two steps to minimize downtime.
Step 1: Initial data copy
The data is copied and the change ID from the VMware disk is set as metadata on the Cinder volume.
|
Note
|
The conversion cannot be made at this moment, and the OpenStack instance is not created. This functionality can be used for large disks with substantial data to transfer. It helps avoid a prolonged service interruption. |
Step 2: Incremental sync and conversion
The VMware Migration Kit compares the source (VMware disk) and the destination (OpenStack volume) change IDs.
|
Note
|
If the change IDs are not equal, the changed blocks between the source and destination are synchronized. Then, the conversion to libvirt/KVM is triggered, and the OpenStack instance is created. This allows for minimal downtime for the VMs. |
2.3. Migration features
You can use the following features when migrating:
-
Discovery mode: Analyze the VMware source environment and collect data for migration planning. See Setting up migration requirements.
-
Network mapping: Map VMware networks to OpenStack networks. See Ansible YAML files for migration.
-
Port creation and MAC address mapping: Create OpenStack ports with preserved MAC addresses from the source VMs. See Ansible YAML files for migration.
-
OpenStack flavor mapping and creation: Automatically find matching flavors or create new ones based on VM specifications. See Flavor mapping and encryption.
-
Migration with
nbdkitserver with change block tracking (CBT) feature: Enable incremental migration with minimal downtime. See VM seeding and Enabling CBT. -
Custom
nbdkitplugin: Replace the default VDDK plugin with an alternative nbdkit plugin. See Using a custom nbdkit plugin. -
Multi-disk migration: Migrate VMs with multiple attached disks. See Multi-disk migration.
-
Multi-disk file system migration: Convert VMs whose file system spans more than one disk. See Multi-disk migration.
-
Multiple NICs: Migrate VMs with multiple network interfaces. See Migrating from VMware to OpenStack.
-
Parallel migration on the same conversion host: Run multiple migrations concurrently on a single conversion host. See Examples of migration times.
-
AWX (or Ansible Automation Platform) integration: Orchestrate migrations through the AWX or automation controller UI. See Creating credentials for AWX and related topics.
2.4. Supported operating systems for virt-v2v
The VMware Migration Kit uses virt-v2v for conversion. For a list of supported guest operating systems for virt-v2v, see the Red Hat Knowledgebase article: Converting virtual machines from other hypervisors to KVM with virt-v2v in RHEL 7, RHEL 8, RHEL 9, and RHEL 10.
OpenStack uses Kernel-based Virtual Machine (KVM) for hypervisors. For a list of certified guest operating systems for KVM, see the Red Hat Knowledgebase article: Certified Guest Operating Systems in Red Hat OpenStack Platform, Red Hat Virtualization, Red Hat OpenShift Virtualization and Red Hat Enterprise Linux with KVM.
2.5. Migration prerequisites
Before you migrate VMware workloads to OpenStack, perform the following checks and validations:
-
Ensure that all virtual machine (VM) disks are consolidated.
-
Check the snapshot hierarchy depth and remove or consolidate unnecessary snapshots.
-
If you use large disks, enable Change Block Tracking (CBT) on the VMs. CBT is a VMware vSphere feature that tracks which disk blocks of a virtual machine (VM) have changed since the last backup or snapshot. You can enable CBT in VMware vSphere.
-
If you use CBT, ensure that VMware Tools is installed.
-
Ensure that you apply the following network configurations.
2.5.1. Network requirements
Ensure that you meet all the following network requirements:
| Port / Protocol | Direction | Source / Destination | Purpose |
|---|---|---|---|
443/TCP |
Egress |
VMware vCenter |
Main VMware communication used for authentication, VM metadata, snapshots, and VDDK operations. |
902/TCP |
Egress |
VMware ESXi hosts |
Direct disk access used to read VM disk data via NFC/NBD protocols. |
22/TCP |
Ingress |
Ansible Controller / Admin |
Remote management of the conversion host over SSH. |
10809/TCP |
Internal to host |
Conversion host |
Local NBDKit server used to stream disk data during conversion (no firewall rule required). |
2.5.2. Disk consolidation
Ensure that all virtual machine disks are consolidated before migration.
Virtual machines with unconsolidated disks may fail during migration or result in data inconsistencies. Disk consolidation merges redundant delta disks created by snapshots back into the base disk.
To check if disks need consolidation:
-
In vSphere Client, check the VM summary tab for "Consolidation needed" warnings
-
Via PowerCLI:
Get-VM | Where-Object {$_.ExtensionData.Runtime.ConsolidationNeeded}
To consolidate disks:
-
In vSphere Client: Right-click the VM, select Snapshots, then Consolidate
-
Ensure the operation completes successfully before proceeding with migration
2.5.3. Snapshot hierarchy depth
Verify that the snapshot hierarchy is not too deep.
-
In vSphere Client: Right-click the VM, select Snapshots, then Manage Snapshots
-
Review the snapshot tree depth
-
If the hierarchy is too deep, consider consolidating or removing unnecessary snapshots before migration
2.5.4. VMware user Access Control Lists
To avoid using the Administrator role and in order to be able to connect, parse the vCenter datastore, manipulate the snapshots and migrate virtual machines, the VMware Migration Kit needs the following ACLs for the vCenter user:
| Category | Privilege Group | Privileges |
|---|---|---|
Datastore |
Browse datastore |
|
Virtual Machine |
Guest operations |
All |
Provisioning |
Allow disk access Allow file access Allow read-only disk access Allow virtual machine download |
|
Service configuration |
Allow notifications Allow polling of global event notifications Read service configuration |
|
Snapshot management |
Create snapshot Remove snapshot Rename snapshot Revert to snapshot |
To verify permissions:
-
In vCenter: Administration, Access Control, Roles
-
Review the assigned role for the migration user
-
Ensure all required privileges are granted
2.5.5. Change Block Tracking
Change Block Tracking is recommended for near-zero downtime migrations with large disks.
|
Note
|
CBT allows incremental data transfer by tracking changed disk blocks between snapshots, significantly reducing downtime during the final synchronization phase. |
2.5.6. VMware Tools installation
VMware Tools installation status should be verified before migration.
-
For standard migrations: Recommended but not mandatory. Improves guest OS detection and metadata gathering, enables graceful shutdown capabilities, and provides better VM customization options post-migration.
-
For CBT-based migrations: Mandatory. CBT functionality requires VMware Tools to be installed. Without VMware Tools, CBT cannot be enabled or used.
To check VMware Tools status via vSphere Client:
-
Select the VM and check the Summary tab
-
Look for "VMware Tools" status: should show "Running" or "OK"
-
Status of "Not installed" or "Not running" indicates action is needed
Via PowerCLI:
Get-VM <vm-name> | Select Name, @{N='Tools Status';E={$_.ExtensionData.Guest.ToolsStatus}}To install VMware Tools:
-
In vSphere Client: Right-click the VM, select Guest OS, then Install VMware Tools
-
Follow the guest OS-specific installation process
-
Verify the installation completes successfully
|
Warning
|
Attempting a CBT-based migration without VMware Tools installed will fail. Ensure VMware Tools are installed and running before enabling CBT. |
2.6. VM seeding
To optimize migrating large disks, you can use VM seeding and Change Block Tracking (CBT). CBT tracks changed VM disk blocks. With VM seeding, you seed most of the VM data incrementally while the VM is live before the final cut-over, when you only need to migrate the VM delta.
The VM in the VMware environment must have the following specifications:
-
Virtual hardware version 7 or newer.
-
Flat VMDK disks that are not independent.
-
The VM must be on VMFS or NFS datastores that are supported by vSphere.
The VM seeding workflow consists of the following steps:
-
Perform an initial full copy of the VM disks from VMware to the target OpenStack volume.
-
Perform subsequent incremental copies that transfer only the blocks that have changed since the previous sync.
-
Repeat these incremental synchronizations as many times as you need while the VM continues running.
-
When the maintenance window arrives, stop the VM and perform a final incremental sync to capture the last changes before the cut-over.
You can transform migration from a risky single event into a safer multi-stage process. You control seeding and cut-over with 2 flags:
-
cbt_sync -
cutover
When you are seeding, use the following values:
cbt_sync: true
cutover: false
When you perform the cut-over, use the following values:
cbt_sync: true
cutover: true
2.7. Enabling CBT
If you use large disks, enable Change Block Tracking (CBT) on the VMs to minimize downtime. CBT is a VMware vSphere feature that tracks which disk blocks of a virtual machine (VM) have changed since the last backup or snapshot.
-
VMware Tools must be installed on the VM.
-
You must power off the VM or take a snapshot to apply the changes.
-
vSphere 4.0 or later.
-
Check VMware Tools status:
-
On the vSphere Client, select the VM and click the
Summarytab. -
Verify if the status of VMware Tools is
RunningorOK. -
(Optional) If the status of VMware Tools is
Not installedorNot running, right click the VM, selectGuest OS,Install VMware Tools, and follow the VMware Tools installation process for the guest operating system.
-
-
Power off the VM.
-
Edit the VM settings and set the
ctkEnabledparameter toTRUE:ctkEnabled = TRUE
-
Set
ctkEnabled = TRUEfor each disk on the VM:scsi0:0.ctkEnabled = TRUE scsi0:1.ctkEnabled = TRUE scsi0:2.ctkEnabled = TRUE ... ...
-
Power on the VM.
-
In the vSphere Client, check the VM configuration for the
changeTrackingEnabledparameter.
2.9. Setting up migration requirements
Before running the migration, you must set up the required Python packages and configuration files on the Migrator host requirements. The setup_requirements.yml playbook automates the installation of dependencies and configuration of the migration environment.
-
Access to the migrator host.
-
If not running from an Ansible Execution Environment (AEE), Python 3 and pip must be available on the migrator host.
-
OpenStack credentials file (
clouds.yaml) in your home directory at~/.config/openstack/clouds.yaml. -
The
os_migrate_vmw_data_dirvariable is set (default:/opt/os-migrate).
-
Create an inventory file that defines the migrator host:
migrator: hosts: localhost: ansible_connection: local ansible_python_interpreter: "{{ ansible_playbook_python }}" -
Run the
setup_requirements.ymlplaybook:ansible-playbook -i inventory.yml \ os_migrate.vmware_migration_kit.setup_requirements \ -e os_migrate_vmw_data_dir=/opt/os-migrate \ -e already_deploy_conversion_host=true \ -e runner_from_aee=falsewhere:
os_migrate_vmw_data_dir-
Specifies the working directory for migration data (default:
/opt/os-migrate). already_deploy_conversion_host-
Set to
trueif you are reusing an existing conversion host; set tofalseif the playbook should deploy a new conversion host. runner_from_aee-
Set to
trueif running from an Ansible Execution Environment container (dependencies are already installed); set tofalseto install dependencies on the migrator host.
The setup_requirements.yml playbook performs the following tasks:
-
Copies the OpenStack credentials file (
clouds.yaml) to the migration working directory if you are deploying a new conversion host. -
Installs required system packages (
python3,python3-pip) if not running from an AEE. -
Installs required Python packages:
-
openstacksdk(version greater than 1.0.0) -
requests -
pyVim -
pyVmomi -
aiohttp
-
-
Verify that the Python packages are installed:
python3 -c "import openstacksdk; import pyVim; import pyVmomi; print('Packages installed successfully')" -
Verify that the OpenStack credentials file exists in the migration working directory:
ls -l /opt/os-migrate/clouds.yaml
2.10. Deploying a conversion host
You can use a Conversion hosts to assist in the migration process. For VMware migrations, it is highly recommended to use CentOS Stream 9 (or RHEL 9.5 and later) to benefit from the virtio-win package version 1.40 or higher, which provides the drivers required for converting Windows distributions.
-
Tenant access to an OpenStack environment.
-
CentOS Stream 9 (or RHEL 9) image uploaded into the OpenStack Image service (Glance).
-
An OpenStack flavor with a recommended minimum 6 vCPU, 8GB RAM and 20GB disk.
-
VMware VDDK library.
-
Download a CentOS Stream 9 cloud image:
curl -O -k https://cloud.centos.org/centos/9-stream/x86_64/images/CentOS-Stream-GenericCloud-9-latest.x86_64.qcow2 -
Create an OpenStack image:
openstack image create --disk-format qcow2 \ --file CentOS-Stream-GenericCloud-9-latest.x86_64.qcow2 \ centos-stream-9 -
Create a conversion host instance:
openstack server create --flavor <flavor-name> \
  --image centos-stream-9 \
  --key-name <your-keypair> \
  --network <your-network> \
  vmware-conversion-host
where:
<flavor-name>-
Specifies an OpenStack flavor with at least 6 vCPU and 8GB RAM.
<your-keypair>-
Specifies the name of your SSH key pair for accessing the instance.
<your-network>-
Specifies the OpenStack network to attach the instance to.
-
Attach a floating IP to the conversion host instance:
openstack floating ip create <external-network> openstack server add floating ip vmware-conversion-host <floating-ip-address> -
Log in to the conversion host as the
cloud-userwith the SSH key you created when you created the conversion host:ssh -i <path-to-private-key> cloud-user@<floating-ip-address> -
(Optional for RHEL only) Register your system with the Red Hat Content Delivery Network (CDN) or with Red Hat Satellite:
sudo subscription-manager register sudo subscription-manager attach --autoNoteCentOS Stream 9 users can skip the registration steps as packages are available without subscription.
-
Install the VMware VDDK library and ensure that you have root ownership. Download the VMware VDDK from the VMware website, extract it, and install it to
/usr/lib/vmware-vix-disklibor another directory of your choice. You will reference this path in your migration variables using theconversion_host_vmware_vix_diskliborimport_workloads_libdirvariable.
-
Verify that the conversion host is accessible:
ssh -i <path-to-private-key> cloud-user@<floating-ip-address> uptime -
Verify that the VDDK library is installed:
ssh -i <path-to-private-key> cloud-user@<floating-ip-address> \
  "ls -la /usr/lib/vmware-vix-disklib"
2.11. Building automation execution environment images
To ensure that you use stable, consistent, and reproducible builds, you can create automation execution environment (AEE) images. AEE images are containerized environments that encapsulate all necessary dependencies for running migration playbooks, including Ansible Core, the VMware Migration Kit collection, OpenStack SDK, and related Python packages.
-
The
ansible-buildertool for building execution environments is installed. For more information about installingansible-builder, see the Ansible Builder documentation. -
The
podmanordockercommand-line tool for the container runtime is installed. -
Access to quay.io and galaxy.ansible.com for the base image and collections.
-
(Optional) If you pull collections from a private Automation Hub, access to that hub and a Galaxy token for it.
-
Create the main execution environment configuration file:
cat <<EOF> execution-environment.yml --- version: 3 images: base_image: name: quay.io/centos/centos:stream9 options: package_manager_path: /usr/bin/microdnf dependencies: ansible_runner: package_pip: ansible-runner ansible_core: package_pip: ansible-core python: requirements.txt system: bindep.txt galaxy: requirements.yml python_interpreter: package_system: "python3" python_path: "/usr/bin/python3" additional_build_files: - src: ansible.cfg dest: . additional_build_steps: prepend_base: - "RUN mkdir -p /etc/sudoers.d" - "RUN echo 'cloud-user ALL=(ALL) NOPASSWD: ALL' > /etc/sudoers.d/cloud-user" EOF -
Create the Python dependencies file:
cat << EOF > requirements.txt requests pyVim pyVmomi EOF -
Create the Ansible collections requirements file for community use:
cat << EOF > requirements.yml collections: - name: vmware.vmware version: 2.4.0 - name: vmware.vmware_rest version: 4.9.0 - name: os_migrate.vmware_migration_kit EOFNoteFor development builds from the main branch, you can install collections directly from Git repositories:
collections: - name: https://github.com/os-migrate/vmware-migration-kit.git type: git version: main -
Create the system package dependencies file:
cat << EOF > bindep.txt openssh-clients sshpass python3 python3-pip python3-dnf rsync gcc python3-devel git EOF -
(Optional) If you pull collections from a private Automation Hub, create the ansible.cfg configuration file with that hub’s URL and your token:
cat << EOF > ansible.cfg [galaxy] server_list = automation_hub [galaxy_server.automation_hub] url=<your_automation_hub_content_url> auth_url=<your_automation_hub_token_url> token=<your_automation_hub_token> EOFNoteFor builds that use galaxy.ansible.com or quay.io/os-migrate, omit this file or use the default Ansible Galaxy configuration.
-
(Optional) If your container registry requires authentication, log in with
podman:podman login <registry> -
Build the AEE image:
ansible-builder build --tag vmware-migration-kit:stable -
(Optional) Push the image to a container registry:
podman tag vmware-migration-kit:stable <registry>/<namespace>/vmware-migration-kit:stable
podman push <registry>/<namespace>/vmware-migration-kit:stable
Instead of building your own AEE image, you can pull the published image from Quay:
podman pull quay.io/os-migrate/vmware-migration-kit:stableTo execute migration playbooks inside the AEE container:
podman run --rm -it \
  -v $(pwd):/runner:z \
  -v ~/.ssh:/home/runner/.ssh:ro \
  quay.io/os-migrate/vmware-migration-kit:stable \
  ansible-playbook -i /runner/inventory \
  -e @/runner/vars.yaml \
  os_migrate.vmware_migration_kit.migration
Common volume mounts for AEE usage:
-
$(pwd):/runner:z: Mount the working directory with SELinux context adjustment -
~/.ssh:/home/runner/.ssh:ro: Mount SSH keys (read-only) -
~/.config/openstack:/home/runner/.config/openstack:ro: Mount OpenStack credentials
2.13. Ansible YAML files for migration
Prepare the Ansible YAML files that you use with the migration playbooks.
2.13.1. Inventory file
The inventory file defines the Migrator host requirements and the Conversion hosts:
migrator:
  hosts:
    localhost:
      ansible_connection: local
      ansible_python_interpreter: "{{ ansible_playbook_python }}"
conversion_host:
  hosts:
    192.168.18.205:
      ansible_ssh_user: cloud-user
      ansible_ssh_private_key_file: /path/to/key
Replace the example IP address with the IP address of your conversion host, and update the path to your SSH private key.
2.13.2. Variables file (myvars.yml)
The variables file contains migration configuration parameters:
# Set to true if running from an Ansible Execution Environment (AEE):
runner_from_aee: true

# Migration working directory:
os_migrate_vmw_data_dir: /opt/os-migrate
copy_openstack_credentials_to_conv_host: false

# Re-use an already deployed conversion host:
already_deploy_conversion_host: true

# If no mapped network then set the OpenStack network UUID:
openstack_private_network: 81cc01d2-5e47-4fad-b387-32686ec71fa4

# Security groups for the instance (UUID):
security_groups: ab7e2b1a-b9d3-4d31-9d2a-bab63f823243

# Use existing flavor or create a new one:
use_existing_flavor: true

# Key pair name (can be left blank):
ssh_key_name: default

# Network settings for OpenStack:
os_migrate_create_network_port: true
copy_metadata_to_conv_host: true
used_mapped_networks: false

# List of VMs to migrate:
vms_list:
  - VM1
  - VM2
  - My_VM
  - Windows_VM
  - RHEL9_VM
  - Accounting_VM
Common variable descriptions:
runner_from_aee-
Set to
trueif running from an AEE container (dependencies already installed); set tofalseto install dependencies on the migrator host. os_migrate_vmw_data_dir-
Working directory for migration data (default:
/opt/os-migrate). already_deploy_conversion_host-
Set to
trueto reuse an existing conversion host; set tofalseto deploy a new one. openstack_private_network-
UUID of the OpenStack network to attach migrated instances to (if not using network mapping).
security_groups-
UUID of the OpenStack security group to apply to migrated instances.
use_existing_flavor-
Set to
trueto find a matching existing flavor; set tofalseto create a new flavor for each VM. os_migrate_create_network_port-
Set to
trueto create OpenStack ports with MAC address mapping; set tofalseto let OpenStack assign MAC addresses. used_mapped_networks-
Set to
trueto use network mapping defined innetwork_map; set tofalseto useopenstack_private_network. vms_list-
List of VM names to migrate from VMware.
2.13.3. Network mapping
If you want to map VMware networks to OpenStack networks, set used_mapped_networks: true and define the mapping:
used_mapped_networks: true
network_map:
  "VM Network": private
  "Management Network": management-net
  "Storage Network": storage-net
The keys are VMware network names, and the values are OpenStack network names.
2.13.4. Secrets file (secrets.yml)
The secrets file contains VMware and OpenStack credentials:
# VMware parameters:
esxi_hostname: 10.0.0.7
vcenter_hostname: 10.0.0.7
vcenter_username: root
vcenter_password: password
vcenter_datacenter: Datacenter

# OpenStack destination cloud authentication:
os_cloud_environ: my-openstack-cloud
dst_cloud:
  auth:
    auth_url: https://keystone.example.com:13000/v3
    username: admin
    project_id: abc123xyz
    project_name: admin
    user_domain_name: Default
    password: openstack-password
  region_name: regionOne
  interface: public
  insecure: false
  identity_api_version: 3
Variable descriptions:
- VMware parameters
-
Replace the example values with credentials and hostnames from your VMware vCenter environment.
dst_cloud-
OpenStack authentication dictionary with Keystone credentials. Replace example values with your OpenStack environment details.
insecure-
Set to
trueto skip SSL certificate verification (for test environments only); set tofalsefor production.
|
Note
|
Store the secrets file securely and do not commit it to version control. Consider using Ansible Vault to encrypt sensitive values: |
2.13.5. Running the migration
To run the migration with these files:
ansible-playbook -i inventory.yml \
  os_migrate.vmware_migration_kit.migration \
  -e @secrets.yml -e @myvars.yml
If the secrets file is encrypted with Ansible Vault:
ansible-playbook -i inventory.yml \
  os_migrate.vmware_migration_kit.migration \
  -e @secrets.yml -e @myvars.yml \
  --ask-vault-pass
2.14. Prelude role argument specifications
The prelude role includes formal argument specifications that validate all variables before migration tasks execute. This prevents silent failures caused by type mismatches in downstream Golang modules.
2.14.1. VMware source parameters
| Variable | Type | Required | Description |
|---|---|---|---|
|
string |
Yes |
Hostname or IP address of the vCenter server |
|
string |
Yes |
Username for vCenter authentication |
|
string |
Yes |
Password for vCenter authentication (no_log enabled) |
|
string |
Yes |
Name of the vCenter Datacenter containing source VMs |
|
string |
Yes |
Hostname or IP of the ESXi host for disk access (NFC/NBD on port 902) |
|
boolean |
No (default: false) |
Skip TLS verification for VMware connections |
2.14.2. Migration scope
| Variable | Type | Required | Description |
|---|---|---|---|
|
list of strings |
Yes |
List of VM names to migrate from VMware to OpenStack |
2.14.3. OpenStack destination
| Variable | Type | Required | Description |
|---|---|---|---|
|
dictionary |
Yes |
Authentication and connection parameters for destination OpenStack cloud |
|
dictionary |
Yes |
Keystone authentication credentials |
|
string |
Yes |
Keystone endpoint URL (for example, https://openstack.example.com:13000/v3) |
|
string |
Yes |
OpenStack username |
2.14.4. Prelude-specific options
| Variable | Type | Required | Description |
|---|---|---|---|
|
list of strings |
No (default: []) |
Lines to add to /etc/hosts on the managed host |
2.14.5. Type enforcement
The argument specifications enforce strict typing to prevent issues such as:
-
identity_api_versionmust be an integer, not a string. -
Boolean flags such as
vmware_insecurecannot accept string values such as "true". -
Authentication dictionaries must contain all required nested keys.
If validation fails, Ansible reports the specific variable and expected type before any migration tasks execute.
2.15. Flavor mapping and encryption
When migrating from VMware to OpenStack, the VMware Migration Kit handles flavor mapping, host aggregate placement, and encryption options to ensure VMs are configured correctly in the destination environment.
2.15.1. Flavor mapping strategies
VMware has no native flavor concept, so the VMware Migration Kit supports several strategies for handling flavors:
Find the closest matching flavor
Enable this strategy with use_existing_flavor: true.
The migration process searches for an existing OpenStack flavor that meets or exceeds the VM requirements (vCPU count, memory, disk size). If no flavor matches, the VMware Migration Kit will create one automatically.
This is the default and recommended approach for most migrations.
Create a new flavor for each VM
Disable flavor matching with use_existing_flavor: false.
The VMware Migration Kit creates a new flavor for each migrated VM. The created flavor name follows the format:
osm-vmware-<vm_name>-<random_id>
Example: osm-vmware-myvm-9999
This approach is useful when you want unique flavors for each VM, or when existing flavors do not align with VMware VM specifications.
Provide a specific flavor UUID
Force the use of a specific flavor by setting the flavor_uuid variable:
flavor_uuid: <your_flavor_uuid>This is useful when you want to:
-
Define custom flavor properties for host aggregation
-
Target specific compute nodes with flavor extra specs
-
Ensure consistent flavor usage across multiple VMs
-
Use flavors with specific hardware requirements (for example, GPU, SR-IOV)
2.15.2. Host aggregates and targeted placement
Host aggregates are a mechanism for partitioning compute hosts in an OpenStack cloud based on arbitrary characteristics such as hardware capabilities, availability zones, or performance tiers.
For more information on how to configure host aggregates in OpenStack, see: https://docs.openstack.org/nova/latest/admin/aggregates.html
Using flavors with host aggregates
To target a specific host aggregate during migration:
-
Create a host aggregate in OpenStack with metadata:
openstack aggregate create --zone performance-zone high-performance openstack aggregate set --property ssd=true high-performance openstack aggregate add host high-performance compute-node-01 -
Create a flavor with matching extra specs:
openstack flavor create --vcpus 4 --ram 8192 --disk 40 high-perf-flavor openstack flavor set --property aggregate_instance_extra_specs:ssd=true high-perf-flavor -
Specify the flavor UUID in your migration variables:
flavor_uuid: <high-perf-flavor-uuid>
When the migration runs, the OpenStack scheduler will place the instance on compute nodes that match the aggregate properties.
2.15.3. Encryption
If you use encryption with your VMware virtual machines (VMware encryption or encrypted file systems), you can provide the decryption key or passphrase using the v2v_extra_opt variable.
Providing a passphrase
v2v_extra_opt: "--key all:key:mypassphrase"Providing a key file
v2v_extra_opt: "--key all:file:/path/to/keyfile"The key file must already be present on the conversion host at the specified path.
Using v2v_extra_opt for other options
The v2v_extra_opt variable is a wrapper for virt-v2v parameters. You can append any valid virt-v2v option through this variable.
For a full list of virt-v2v options, see: https://libguestfs.org/virt-v2v.1.html
Examples:
-
Enable verbose logging:
v2v_extra_opt: "-v -x" -
Specify a custom root filesystem:
v2v_extra_opt: "--root first" -
Combine multiple options:
v2v_extra_opt: "--key all:key:mypassphrase -v -x"
|
Warning
|
When providing encryption keys via variables, ensure that the variables file is stored securely and is not committed to version control. Use Ansible Vault to encrypt sensitive variables. |
2.15.4. First boot script injection
You can inject a script or command during the migration that will execute at the first boot of the new OpenStack disk.
v2v_first_boot_script: "/path/to/firstboot.sh"The first boot script must already be present on the conversion host at the specified path.
This feature allows you to:
-
Remove VMware Tools and install OpenStack guest agents
-
Reconfigure network interfaces for the new environment
-
Update system configurations for the OpenStack platform
-
Install monitoring or management agents
-
Perform post-migration validation checks
For more information on creating first boot scripts, see Scripting for post-migration VM start.
2.15.5. Example flavor mapping configurations
Configuration 1: Use existing flavors
use_existing_flavor: trueThe migration searches for matching flavors. If no match is found, a new flavor is created automatically.
Configuration 2: Always create new flavors
use_existing_flavor: falseA new flavor with the format osm-vmware-<vm_name>-<random_id> is created for each VM.
Configuration 3: Force a specific flavor
flavor_uuid: 123e4567-e89b-12d3-a456-426614174000All VMs use the specified flavor UUID.
Configuration 4: Force a specific flavor with host aggregate
flavor_uuid: 123e4567-e89b-12d3-a456-426614174000The flavor has extra specs that target a host aggregate:
openstack flavor show <flavor_uuid> -c properties
# Output:
# properties:
#   aggregate_instance_extra_specs:ssd=true
VMs are placed on compute nodes that belong to the matching aggregate.
2.16. Migrating from VMware to OpenStack
Run a complete migration cycle using the Ansible playbook from the command line interface.
-
You have configured and deployed an OpenStack instance in the destination cloud as a Conversion hosts.
-
You have the Ansible YAML files as described in Ansible YAML files for migration:
-
inventory.yml -
myvars.yml -
secrets.yml
-
-
You have Installing the OS Migrate collections.
-
Pull the stable version of the Ansible Execution Environment (AEE) image:
podman pull quay.io/os-migrate/vmware-migration-kit:stable -
Run the AEE container in interactive mode:
podman run --rm -it \ -v $(pwd):/runner:z \ -v ~/.ssh:/home/runner/.ssh:ro \ quay.io/os-migrate/vmware-migration-kit:stable \ /bin/bash -
(Optional) If you cloned the VMware Migration Kit repository, navigate to the repository directory:
cd /root/vmware-migration-kit/vmware_migration_kit -
(Optional) Apply available updates from the repository:
git pull -
Configure SSH access to the conversion host. Create the SSH directory and add your private key:
mkdir -p /root/.ssh/ cat <<EOF > /root/.ssh/conv_host -----BEGIN OPENSSH PRIVATE KEY----- <Add your SSH Key here> -----END OPENSSH PRIVATE KEY----- EOF chmod 600 /root/.ssh/conv_host -
Create or edit the
inventory.ymlfile to reference your conversion host:migrator: hosts: localhost: ansible_connection: local ansible_python_interpreter: "{{ ansible_playbook_python }}" conversion_host: hosts: 10.0.79.209: ansible_ssh_user: cloud-user ansible_ssh_private_key_file: /root/.ssh/conv_hostReplace
10.0.79.209with the IP address of your conversion host. -
(Optional for virt-v2v workflow) Get the VDDK thumbprint from your ESXi server:
openssl s_client -connect <ESXI_SERVER_NAME>:443 </dev/null | \ openssl x509 -in /dev/stdin -fingerprint -sha1 -nooutNoteThe VDDK thumbprint is only required if you are using the virt-v2v workflow instead of the default nbdkit workflow.
-
Configure the
myvars.ymlfile with your migration parameters as described in Ansible YAML files for migration. -
Configure the
secrets.ymlfile with your VMware vCenter credentials and OpenStack authentication as described in Ansible YAML files for migration. -
Run the migration playbook:
ansible-playbook -i inventory.yml \
  os_migrate.vmware_migration_kit.migration \
  -e @secrets.yml -e @myvars.yml
If you prefer to run the migration directly on your system without using an AEE container:
-
Install the collection from Ansible Galaxy:
ansible-galaxy collection install os_migrate.vmware_migration_kit -
Ensure Python dependencies are installed:
pip install openstacksdk requests pyVim pyVmomi -
Run the migration playbook:
ansible-playbook -i inventory.yml \
  os_migrate.vmware_migration_kit.migration \
  -e @secrets.yml -e @myvars.yml
-
Monitor the migration progress in the Ansible playbook output.
-
After the migration completes, verify that the instances are created in OpenStack:
openstack server list -
Verify that the instances are accessible:
openstack console url show <instance-name>
2.17. Importing VMware volumes
The import_volumes.yml playbook allows you to import VMware VM disks as OpenStack Cinder volumes without creating the full OpenStack instance. This is useful for pre-migration scenarios where you want to transfer disk data separately from instance creation, or for creating bootable volumes that can be used later.
2.17.1. What the volume import does
The volume import workflow performs the following tasks:
-
Connects to the VMware vCenter and ESXi hosts to access VM disk data.
-
Uses nbdkit (default) or virt-v2v to stream and convert VMware VMDK disks.
-
Creates Cinder volumes in OpenStack with the converted disk data.
-
Preserves disk metadata such as size and CBT change IDs (if applicable).
-
Does not create network ports or OpenStack instances.
2.17.2. Running the volume import playbook
To run the volume import independently:
ansible-playbook -i inventory.yml \
  os_migrate.vmware_migration_kit.import_volumes \
  -e @secrets.yml -e @myvars.yml
2.17.3. Configuration for volume-only import
The import_volumes.yml playbook sets the following parameters to import volumes without creating instances:
os_migrate_nbkit: true
os_migrate_virt_v2v: false
os_migrate_create_network_port: false
os_migrate_create_os_instance: false
os_migrate_tear_down: false
Variable descriptions:
os_migrate_nbkit-
Set to
trueto use the nbdkit method for disk transfer (default and recommended). os_migrate_virt_v2v-
Set to
trueto use virt-v2v instead of nbdkit (not recommended for volume-only import). os_migrate_create_network_port-
Set to
falseto skip OpenStack network port creation. os_migrate_create_os_instance-
Set to
falseto skip OpenStack instance creation after volume import. os_migrate_tear_down-
Set to
falseto keep the volumes after import (set totrueto delete volumes for testing).
2.17.4. Volume import workflow
The volume import process follows these steps:
-
The Migrator host requirements runs preparation tasks using the
preluderole to set up the migration environment. -
The Conversion hosts executes the
import_workloadsrole for each VM in thevms_list. -
For each VM disk:
-
A snapshot is created in VMware (if using CBT).
-
The nbdkit server is started on the conversion host to stream the VMDK data.
-
A Cinder volume is created in OpenStack with the appropriate size.
-
The disk data is copied from VMware to the Cinder volume using nbdcopy.
-
If using CBT, the VMware change ID is stored as volume metadata for future incremental syncs.
-
The snapshot is removed from VMware (unless preserved for future CBT syncs).
-
-
The imported volumes are available in OpenStack for later use.
2.17.5. Using imported volumes
After importing volumes, you can:
-
Create bootable volumes for instance creation:
openstack volume set --bootable <volume-id> -
Launch instances from the volumes:
openstack server create --flavor <flavor> \ --volume <volume-id> \ --network <network> \ <instance-name> -
Perform incremental CBT syncs by running the import again with the same VM (if CBT is enabled).
-
Use the volumes as additional data disks attached to existing instances.
2.17.6. CBT incremental sync with volume import
If you are using CBT for incremental migration, you can run the volume import multiple times:
-
First run: Creates the volume and performs a full copy of the disk data. The VMware change ID is stored as volume metadata.
-
Subsequent runs: Compare the source VMware change ID with the destination volume metadata. Only changed blocks are synchronized.
-
Final cutover: Set
os_migrate_create_os_instance: trueto create the instance after the final sync.
To perform a CBT sync without creating an instance:
# In myvars.yml
cbt_sync: true
cutover: false
os_migrate_create_os_instance: false
To perform the final cutover and create the instance:
# In myvars.yml
cbt_sync: true
cutover: true
os_migrate_create_os_instance: true
2.17.7. Verification
-
List the imported volumes in OpenStack:
openstack volume list -
View volume details including size and status:
openstack volume show <volume-name> -
Check volume metadata for CBT change IDs (if applicable):
openstack volume show <volume-name> -f json | jq '.metadata'
2.17.8. Use cases for volume-only import
-
Pre-migration: Import volume data during off-peak hours, then create instances during a maintenance window.
-
Testing: Validate the disk conversion and data integrity before full migration.
-
Disaster recovery: Create volume copies in OpenStack while keeping VMware VMs running.
-
Incremental migration: Use CBT to sync data multiple times before final cutover.
-
Bootable volume creation: Prepare volumes that can be used to boot multiple instances.
2.18. Metadata conversion
The metadata conversion process transforms VMware VM specifications into OpenStack-compatible formats. The convert_metadata.yml playbook and the convert_metadata role automate the mapping of VMware VM properties (CPU, memory, disk, network) to OpenStack flavors, network ports, and instance metadata.
2.18.1. What the metadata conversion does
The metadata conversion process performs the following tasks:
-
Reads VM metadata from VMware (CPU count, memory, disk sizes, network interfaces).
-
Finds the best matching OpenStack flavor based on vCPU and memory requirements, or creates a new flavor if no match exists.
-
Maps VMware networks to OpenStack networks based on the
network_mapconfiguration. -
Generates an
import_workloads.jsonfile for each VM that contains all the parameters needed for the migration. -
Optionally creates OpenStack flavors in the destination cloud.
-
Copies metadata files to the conversion host if
copy_metadata_to_conv_hostis enabled.
2.18.2. Running the metadata conversion playbook
To run the metadata conversion independently of the main migration workflow:
ansible-playbook -i inventory.yml \
  os_migrate.vmware_migration_kit.convert_metadata \
  -e @secrets.yml -e @myvars.yml
2.18.3. What the convert_metadata role does
The convert_metadata role is invoked for each VM in the vms_list and performs the following steps:
-
Loads the VM metadata files:
-
vm_info.json: Basic VM information (name, power state, annotations) -
guest_info.json: Guest OS information, CPU count, memory size -
disk_info.json: Disk configurations, sizes, and paths -
network_info.json: Network interface details and MAC addresses
-
-
Finds the best matching OpenStack flavor:
-
If
use_existing_flavor: true, searches for an existing flavor that meets or exceeds the VM requirements -
If no match is found or
use_existing_flavor: false, generates a new flavor specification with the name format:osm-vmware-<vm_name>-<random_id> -
If
flavor_uuidis defined, uses the specified flavor directly
-
-
Exports the flavor definition to a YAML file at
<os_migrate_vmw_data_dir>/<vm_name>/flavors.yml -
Creates an
import_workloads.jsonfile that contains:-
VM name and OpenStack flavor selection
-
Network mapping (VMware network to OpenStack network)
-
Port creation settings and MAC address preservation
-
Disk information for volume creation
-
Migration flags (CBT, conversion method, instance creation)
-
-
Optionally creates the flavor in OpenStack if it does not exist
-
Copies metadata files to the conversion host for use during the migration
2.18.4. Metadata file locations
After running the metadata conversion, files are stored in the migration working directory:
/opt/os-migrate/
├── VM1/
│   ├── vm_info.json
│   ├── guest_info.json
│   ├── disk_info.json
│   ├── network_info.json
│   ├── flavors.yml
│   └── import_workloads.json
├── VM2/
│   ├── vm_info.json
│   ├── guest_info.json
│   ├── disk_info.json
│   ├── network_info.json
│   ├── flavors.yml
│   └── import_workloads.json
2.18.5. Variables used by metadata conversion
The following variables control the metadata conversion behavior:
use_existing_flavor-
Set to
trueto search for an existing matching flavor; set tofalseto always create a new flavor (default:true). flavor_uuid-
If defined, forces the use of a specific flavor UUID instead of matching or creating.
create_flavor-
Automatically set by the role. Set to
trueif a new flavor should be created in OpenStack. used_mapped_networks-
Set to
trueto usenetwork_mapfor network mapping; set tofalseto useopenstack_private_networkfor all VMs. network_map-
Dictionary mapping VMware network names to OpenStack network names.
copy_metadata_to_conv_host-
Set to
trueto copy metadata files to the conversion host; set tofalseto keep them only on the migrator host (default:false).
2.18.6. Example import_workloads.json
An example of the generated import_workloads.json file:
{
  "vm_name": "rhel-9.4-1",
  "openstack": {
    "flavor_name": "osm-vmware-rhel-9.4-1-5432",
    "network": "private",
    "security_groups": ["default"]
  },
  "vmware_guest_info": {
    "num_cpu": 2,
    "memory_mb": 4096,
    "disks": [
      {
        "size_gb": 20,
        "type": "thin"
      }
    ],
    "networks": [
      {
        "name": "VM Network",
        "mac": "00:50:56:ab:cd:ef"
      }
    ]
  },
  "migration": {
    "cbt_sync": false,
    "cutover": true,
    "create_instance": true
  }
}
2.18.7. Integration with the migration workflow
The metadata conversion is typically run as part of the discovery phase before the main migration. The main migration.yml playbook includes the metadata conversion automatically. However, you can run it independently to:
-
Preview what flavors will be created or matched
-
Validate network mappings before migration
-
Generate metadata files for review and approval
-
Pre-create flavors in OpenStack before the migration window
2.19. Multi-disk migration
The VMware Migration Kit migrates and attaches all disks from source VMs to the target OpenStack instances. It also supports VMs whose file system spans more than one disk.
2.19.1. Multi-disk VM support
The VMware Migration Kit automatically migrates and attaches all disks from source VMs to the target OpenStack instances.
When you run the import_workloads role:
-
All disks from each source VM are migrated to OpenStack Cinder volumes.
-
The first disk becomes the boot volume.
-
Additional disks are attached as data volumes to the resulting instance.
-
The Heat template generator creates the necessary volume attachments automatically.
Volume naming convention
Migrated volumes follow this naming pattern:
<vm-name>-<disk-key>For example, if a VM named vm-1 has disks with keys scsi0-0-0 (boot) and scsi0-0-1 (data), the volumes are named:
-
vm-1-scsi0-0-0(boot volume) -
vm-1-scsi0-0-1(data volume, automatically attached)
Heat template structure
The generated Heat template includes:
-
Parameters for each volume ID (
<vm_name>_boot_volume_id,<vm_name>_data_volume_0_id, and so on). -
Volume attachment resources for data disks.
-
block_device_mapping_v2entries linking volumes to the instance.
The workflow discovers and attaches all disks automatically, with no manual configuration required.
For a VM with one boot disk and two data disks, the heat_vms_data structure contains:
vms_data:
  - name: myvm
    boot_volume_id: "uuid-of-boot-volume"
    data_volume_ids:
      - "uuid-of-data-volume-1"
      - "uuid-of-data-volume-2"
    flavor: "m1.medium"
    network: "provider_network_1"
    security_groups: ["default"]
All three volumes are attached to the instance when the Heat stack is created.
2.19.2. Multi-disk file system
Some virtual machines have their file system installed across multiple disks. For example, the root file system (/) can span /dev/vda and /dev/vdb at the same time. In that case, a standard per-disk conversion produces inconsistent volumes, because virt-v2v needs to see all disks as a single logical domain to convert them correctly.
To handle this scenario, set:
import_workloads_multidiskfs: trueWhen this option is enabled, the VMware Migration Kit queries the VMware API to determine the disk layout of the source VM (bus type and device name for each disk), builds a libvirt domain XML file that describes all disks together, and passes it to virt-v2v-in-place using -i libvirtxml instead of -i disk.
Debugging multi-disk file system migrations
If the conversion fails or produces unexpected results, the following artifacts are available on the conversion host for troubleshooting:
- Log file
-
One log file per migration under
/tmp:tail -f /tmp/osm-nbdkit-<vm-name>-<random-id>.logThis log contains the full
nbdcopycommand used to copy each disk, as well as thevirt-v2v-in-placeinvocation. - Domain XML file
-
Written to
/tmpbefore the conversion runs:cat /tmp/<vm-name><random-id>-domain.xmlThis file describes the disk layout as the VMware Migration Kit understood it from VMware. Check that each disk entry has the correct device path (
source file) and target device name (target dev). If a disk is mapped to the wrong device, the converted instance might not boot. - nbdcopy command
-
The exact
nbdcopyinvocation for each disk is printed in the log file. You can replay it manually on the conversion host to test connectivity and data transfer independently of the rest of the migration.
2.20. Using a custom nbdkit plugin
By default, the VMware Migration Kit uses the nbdkit vddk plugin to transfer VMware virtual machine disks. In some scenarios, you might want to bypass VDDK and use an alternative nbdkit plugin, for example a third-party plugin that implements the NBD or NFC protocol.
The custom_nbdkit_plugin variable specifies the absolute path to a custom nbdkit plugin shared library (.so file) on the conversion host.
2.20.1. Configuration
Set the custom_nbdkit_plugin variable to the full path of your plugin:
custom_nbdkit_plugin: /home/cloud-user/nbdkit-nfc-plugin.soWhen this variable is set:
-
nbdkit is invoked with your custom plugin instead of
vddk. -
VDDK-specific parameters (
libdir,compression,transports, and disk name) are omitted from the nbdkit command. -
Only the common parameters (
server,user,password,thumbprint,vm, andsnapshot) are passed.
2.20.2. Example usage
- name: Import VM with custom nbdkit plugin
  import_role:
    name: os_migrate.vmware_migration_kit.import_workloads
  vars:
    import_workloads_conversion_host_ssh_private_key: /path/to/key
    import_workloads_src_conversion_host: conversion-host.example.com
    import_workloads_src_conversion_host_username: cloud-user
    import_workloads_filters:
      - vmware_name: my-vm
    import_workloads_vddk_thumbprint: "AA:BB:CC:DD..."
    custom_nbdkit_plugin: /home/cloud-user/go-nfc/plugins/nbdkit-nfc/nbdkit-nfc-plugin.so
2.20.3. Requirements
-
The custom plugin
.sofile must be present on the conversion host at the specified path. -
The plugin must be compatible with nbdkit and accept the parameters passed by the VMware Migration Kit.
-
Leave
custom_nbdkit_pluginempty or unset to use the default VDDK plugin.
|
Note
|
When using a custom plugin, ensure that it supports the VMware connection parameters and snapshot handling required for migration. |
2.21. Configuring migration from local shared NFS
You can mount NFS storage on the Conversion hosts when VMware virtual machines reside on an NFS datastore that is accessible to the conversion host. The conversion host directly consumes virtual machine disks (vmdk) from the local NFS mount, reducing network overhead and I/O latency by bypassing the need to stream data through the VMware vCenter API.
|
Note
|
Only cold migration is supported when using local NFS access. The VMs must be powered off before migration. |
-
VMware virtual machines are stored on an NFS datastore.
-
The NFS datastore is accessible and mountable from the conversion host.
-
The conversion host has network connectivity to the NFS server.
-
The VMs to be migrated are powered off.
-
Mount the NFS datastore on the conversion host:
sudo mkdir -p /srv/nfs
sudo mount -t nfs <nfs-server>:<nfs-export-path> /srv/nfs
where:
<nfs-server>-
Hostname or IP address of the NFS server hosting the VMware datastore.
<nfs-export-path>-
Export path of the NFS share (for example,
/vmware/datastore1).
-
Verify the mount and locate the VM disk files:
ls -lh /srv/nfsYou should see directories corresponding to your VMs, each containing
.vmdkfiles. -
Set the path to the NFS mount point in your variables file (
myvars.yml) using theimport_workloads_local_disk_pathvariable:import_workloads_local_disk_path: "/srv/nfs" -
Run the migration playbook as described in Migrating from VMware to OpenStack:
ansible-playbook -i inventory.yml \
  os_migrate.vmware_migration_kit.migration \
  -e @secrets.yml -e @myvars.yml
When import_workloads_local_disk_path is set, the migration workflow changes:
-
The migration bypasses the VMware vCenter API for disk data transfer.
-
Disk files are read directly from the NFS mount point.
-
The conversion process (libvirt conversion to KVM-compatible format) still occurs on the conversion host.
-
The converted disks are uploaded to OpenStack Cinder volumes or the OpenStack Image service (Glance).
-
Direct NFS access typically provides faster disk reads compared to streaming through the vCenter API.
-
Network bandwidth between the conversion host and the NFS server becomes the bottleneck instead of the vCenter API.
-
For large-scale migrations, ensure the NFS server can handle concurrent reads from multiple conversion hosts.
-
Monitor the migration logs for references to the local NFS path instead of vCenter disk streaming.
-
Verify that the migrated instances boot successfully in OpenStack:
openstack server list --long
2.23. Creating credentials for AWX
Create credentials in AWX (or Ansible Automation Platform) to authenticate with the conversion host during migration.
-
From the navigation panel, select the AWX or automation controller UI, then
Infrastructure, thenCredentials. -
Click
Create Credential. -
Set the following parameters:
Name: Conversion Host SSH Key
Credential Type: Machine
Username: cloud-user
SSH Private Key: <paste your SSH private key>
where:
SSH Private Key-
Paste the SSH private key that corresponds to the public key configured on the conversion host. This is typically the key you specified when creating the conversion host instance.
-
Click
Create Credential.
The credential is available for use in job templates.
2.24. Creating an inventory for AWX
Create an inventory in AWX (or Ansible Automation Platform) to manage the conversion host and migrator host.
-
From the navigation panel, select the AWX or automation controller UI, then
Infrastructure, thenInventories. -
Click
Create Inventory, thenCreate Inventory. -
Set the following parameters:
Name: VMware Migration Inventory
Organization: Default
-
Click
Create Inventory.
The inventory is available for adding hosts.
2.25. Creating hosts for AWX
Create hosts in AWX (or Ansible Automation Platform) for the conversion host and the migrator host.
-
Create the conversion host:
-
From the navigation panel, select the AWX or automation controller UI, then
Infrastructure, thenHosts. -
Click
Create Host. -
Set the following parameters:
Name: conversion_host
Inventory: VMware Migration Inventory
Variables:
ansible_ssh_user: cloud-user
ansible_host: <IP_or_hostname>
where:
<IP_or_hostname>-
Specifies the IP address or hostname of your conversion host.
-
Click
Create Host.
-
-
Create the migrator host:
-
From the navigation panel, select the AWX or automation controller UI, then
Infrastructure, thenHosts. -
Click
Create Host. -
Set the following parameters:
Name: migrator Inventory: VMware Migration Inventory Variables: ansible_connection: local ansible_python_interpreter: '{{ ansible_playbook_python }}' -
Click
Create Host.
-
Both hosts are available in the inventory for job template execution.
2.26. Creating an execution environment
Create an execution environment in AWX (or Ansible Automation Platform) that references the VMware Migration Kit container image.
-
You have built and pushed an automation execution environment image to a container registry, or you are using the published image from quay.io/os-migrate/vmware-migration-kit. See Building automation execution environment images.
-
From the navigation panel, select the AWX or automation controller UI, then
Infrastructure, thenExecution Environments. -
Click
Create Execution Environment. -
Set the following parameters:
Name: VMware Migration Kit Execution Environment
Image: quay.io/os-migrate/vmware-migration-kit:stable
Pull: Always pull container before running
where:
Image-
Specifies the container image URL. Use
quay.io/os-migrate/vmware-migration-kit:stablefor the published stable image, or specify your own registry and image tag if you built a custom image. Pull-
Set to "Always pull container before running" so that each job pulls the image from the registry before it runs.
-
Click
Create Execution Environment.
The execution environment is available for use in projects and job templates.
2.27. Creating a project
Create a project in AWX (or Ansible Automation Platform) that points to the VMware Migration Kit repository.
-
From the navigation panel, select the AWX or automation controller UI, then
Projects. -
Click
Create Project. -
Set the following parameters:
Name: VMware Migration Kit Project
Organization: Default
Execution Environment: VMware Migration Kit Execution Environment
Source Control Type: Git
Source Control URL: https://github.com/os-migrate/vmware-migration-kit
Source Control Branch/Tag/Commit: v2.1.0
where:
Execution Environment-
Select the execution environment you created in Creating an execution environment.
Source Control Branch/Tag/Commit-
Specify a stable release tag (for example,
v2.1.0) for production use, ormainfor the ongoing development version.
-
Click
Create Project.
The project is synchronized with the Git repository and is available for use in job templates.
-
Wait for the project to sync. The status should change to "Successful" with a green checkmark.
-
If the sync fails, check the project logs for errors related to network connectivity or repository access.
2.28. Configuring the job template
Configure a job template in AWX (or Ansible Automation Platform) to run the VMware migration playbook.
-
You have created the inventory as described in Creating an inventory for AWX.
-
You have created the hosts as described in Creating hosts for AWX.
-
You have created the credentials as described in Creating credentials for AWX.
-
You have created the execution environment as described in Creating an execution environment.
-
You have created the project as described in Creating a project.
-
From the navigation panel, select the AWX or automation controller UI, then
Templates. -
Click
Create Template, thenCreate Job Template. -
Set the following parameters:
Name: VMware to OpenStack Migration
Inventory: VMware Migration Inventory
Project: VMware Migration Kit Project
Playbook: playbooks/migration.yml
Execution Environment: VMware Migration Kit Execution Environment
Credentials: Conversion Host SSH Key
Extra Variables: <Add your variables here>
where:
Playbook-
Select
playbooks/migration.ymlfrom the dropdown list of playbooks available in the project. Extra Variables-
Add the contents of your
myvars.ymlandsecrets.ymlfiles in YAML format. For example:# Variables from myvars.yml runner_from_aee: true os_migrate_vmw_data_dir: /opt/os-migrate already_deploy_conversion_host: true openstack_private_network: 81cc01d2-5e47-4fad-b387-32686ec71fa4 security_groups: ab7e2b1a-b9d3-4d31-9d2a-bab63f823243 use_existing_flavor: true ssh_key_name: default os_migrate_create_network_port: true copy_metadata_to_conv_host: true used_mapped_networks: false vms_list: - VM1 - VM2 - VM3 # Secrets from secrets.yml esxi_hostname: 10.0.0.7 vcenter_hostname: 10.0.0.7 vcenter_username: root vcenter_password: password vcenter_datacenter: Datacenter dst_cloud: auth: auth_url: https://keystone.example.com:13000/v3 username: admin project_id: abc123 project_name: admin user_domain_name: Default password: openstack-password region_name: regionOne interface: public insecure: false identity_api_version: 3
-
Click
Create Job Template.
The job template is ready to launch.
|
Warning
|
Storing sensitive credentials in the job template extra variables exposes them in the AWX interface. For production use, consider using AWX credential types to store VMware and OpenStack credentials separately, or use Ansible Vault to encrypt the secrets. |
2.29. Launching the migration
Launch the VMware to OpenStack migration job in AWX (or Ansible Automation Platform).
-
You have configured the job template as described in Configuring the job template.
-
The conversion host is accessible and running.
-
The VMware vCenter is accessible from the migrator host.
-
The OpenStack destination cloud is accessible and has sufficient resources (quotas, capacity) for the migrated VMs.
-
From the navigation panel, select the AWX or automation controller UI, then
Templates. -
Locate the
VMware to OpenStack Migrationjob template. -
Click the rocket icon to launch the migration.
-
(Optional) Review the extra variables and make any last-minute adjustments.
-
Click
Launch.
The job starts and you can monitor the progress in the job output view.
-
The job output view displays real-time Ansible playbook execution output.
-
Expand the task details to see detailed logs for each migration step.
-
Monitor for errors or warnings related to VMware connectivity, disk conversion, or OpenStack resource creation.
-
The migration progress is logged for each VM in the
vms_list.
The job executes the following high-level steps:
-
Preparation: Sets up the migration environment and validates connectivity.
-
Metadata conversion: Converts VMware VM specifications to OpenStack flavors and instance metadata. See Metadata conversion.
-
Volume import: Migrates VM disks from VMware to OpenStack Cinder volumes. See Importing VMware volumes.
-
Instance creation: Creates OpenStack instances with the migrated volumes and configured networks.
-
Verification: Validates that instances are created and accessible.
After the job completes:
-
Verify that the job status is "Successful" with a green checkmark.
-
Log in to the OpenStack environment and check that the instances are created:
openstack server list -
Verify that the instances are in "ACTIVE" status:
openstack server show <instance-name> -
Test connectivity to the migrated instances:
openstack console url show <instance-name>
If the job fails, check the following:
-
Review the job output for error messages.
-
Verify connectivity between the conversion host and VMware vCenter (port 443, 902).
-
Verify connectivity between the conversion host and OpenStack API endpoints.
-
Check OpenStack quotas and capacity (sufficient vCPUs, RAM, storage, floating IPs).
-
Review the migration logs on the conversion host at
/tmp/osm-nbdkit-<vm-name>-<random-id>.log. -
See Connectivity from conversion host to source environment, NBDKit errors, and Debugging manually for troubleshooting guidance.
2.31. Migration best practices
The following are migration best practices when you migrate a large workload from VMware to OpenStack using AWX (or Ansible Automation Platform) with a conversion host.
-
Ensure that you size your destination OpenStack environment appropriately to accommodate large numbers of instances, ports, volumes, floating IPs, API requests, and other OpenStack resources.
-
Divide your workload among multiple conversion hosts and threads for faster migration.
-
A conversion host typically contains the following configuration:
-
6 vCPU
-
8GB RAM
-
20GB disk
-
CentOS Stream 9 (or RHEL 9.5 and later)
-
-
For each parallel migration, allocate 2GB of RAM and 1 vCPU on your conversion host.
-
Ensure all OpenStack services are configured to support a large number of requests. The VMware Migration Kit is driven by Ansible but the core of the migration is a binary that does not consume substantial resources. The more you use the binary, the more requests the OpenStack API will receive. Services such as RabbitMQ, Galera, Nova, and Cinder will be impacted by high concurrency.
-
Use CentOS Stream 9 (or RHEL 9.5 and later) for conversion hosts to benefit from the virtio-win package version 1.40 or higher, which provides the drivers required for converting Windows distributions.
-
Use Fedora 38 and later if you need to convert btrfs file systems.
-
For large disks with substantial data, use Change Block Tracking (CBT) to enable incremental migration and minimize downtime. See VM seeding and Enabling CBT.
-
Plan the migration in phases: discovery, pre-migration, seeding (if using CBT), and cutover.
-
Test the migration with a small subset of VMs before migrating the full workload.
-
Set OpenStack quotas to appropriate values for the expected workload (instances, vCPUs, RAM, volumes, ports, floating IPs).
-
Monitor the migration progress and review logs for errors or warnings.
2.31.1. Known issues
The following issues may occur during large-scale migrations:
-
If a single conversion host performs thousands of migrations in a short time, there might be issues with the device mount mechanism in the operating system. You can remedy this by rebooting the conversion host to clean the
/dev/directory. -
If you encounter the message
snapshot hierarchy is too deep, clean the guest snapshots hierarchy in VMware and re-run the migration. -
VMware may impose limits on concurrent snapshot operations. If you are running many parallel migrations, you may need to reduce the concurrency or stagger the migration batches.
-
Network bandwidth between the conversion host and VMware ESXi hosts can become a bottleneck. Monitor network utilization and consider distributing migrations across multiple conversion hosts.
2.31.2. How to proceed with a large workload
For large workloads (hundreds or thousands of VMs), follow these planning steps:
-
Size the target OpenStack environment adequately to receive the instances, ports, volumes, floating IPs, and other resources.
-
Set OpenStack quotas to appropriate values.
-
Split the workload by the number of conversion hosts you will create.
-
Determine the concurrency per conversion host based on the conversion host flavor (2GB RAM and 1 vCPU per concurrent migration).
-
Calculate the estimated migration time:
If 1 virtual machine takes 5 minutes to migrate and you have 1000 VMs with 2 conversion hosts running 6 parallel migrations each:
Migration time = (5 minutes × 1000 VMs) / (2 conversion hosts × 6 parallel migrations) = 5000 / 12 = 416 minutes (approximately 7 hours) -
Add more conversion hosts to reduce migration time:
With 4 conversion hosts running 6 parallel migrations each:
Migration time = (5 minutes × 1000 VMs) / (4 conversion hosts × 6 parallel migrations) = 5000 / 24 = 208 minutes (approximately 3.5 hours) -
Schedule the migration during a maintenance window to minimize disruption.
-
Monitor the migration progress and have a rollback plan in case of failures.
2.32. Examples of migration times
The following tables contain example performance measurements for migrating from VMware to OpenStack using the VMware Migration Kit. These benchmarks were measured in a lab environment with conversion hosts configured with 6 vCPU and 8GB RAM.
2.32.1. Migration with 1 conversion host
Time of execution to completion including instance boot and ping for Linux machines.
| VMs | Threads | Time |
|---|---|---|
1 |
1 |
2 minutes |
20 |
1 |
31 minutes |
20 |
2 |
15 minutes |
30 |
10 |
8 minutes |
100 |
10 |
20 minutes |
|
Note
|
The average time for 1 virtual machine is around 2 minutes. The migration can be parallelized on the same conversion host (threads) or on multiple conversion hosts. |
2.32.2. Migration of Linux VMs with large disks
Time for Linux machines with larger disks (99 percent full of random data) for a full migration run with and without Change Block Tracking (CBT).
| Disk size | CBT enabled | Time total | Cutover time | Expected downtime |
|---|---|---|---|---|
100 GB |
yes |
8 minutes |
2 minutes |
2 minutes |
100 GB |
no |
7 minutes |
7 minutes |
|
200 GB |
yes |
10 minutes 30 seconds |
2 minutes |
2 minutes |
200 GB |
no |
9 minutes 30 seconds |
9 minutes 30 seconds |
|
300 GB |
yes |
17 minutes |
2 minutes |
2 minutes |
300 GB |
no |
15 minutes |
15 minutes |
|
1 TB |
yes |
39 minutes |
2 minutes |
2 minutes |
1 TB |
no |
35 minutes |
35 minutes |
|
Note
|
Enabling Change Block Tracking (CBT) takes more time overall to migrate but results in less downtime due to the smaller data cutover time. The CBT option performs an initial full copy followed by incremental syncs before the final cutover. |
2.32.3. Migration of 55 VMs with 200GB disks
Example of a migration plan for 55 VMs with 200 GB disks (99 percent full of random data).
| Threads | CBT enabled | Migration time | Sync time |
|---|---|---|---|
1 |
yes |
115 minutes |
|
5 |
no |
105 minutes |
|
5 |
yes |
22 minutes |
110 minutes |
|
Note
|
For this example, the best plan is to parallelize the migration on a single conversion host with 5 threads and use the CBT option to pre-migrate the volume data. This shortens the cutover time (2 minutes in the lab environment), reducing the overall downtime. |
2.32.4. Migration of 1500 VMs with 20GB disks
Time for Linux machines with 20GB disks for a full migration run which comprises migration of data, conversion, instance creation, boot time, and ability to ping.
| VMs | Conversion Hosts | Threads | Time |
|---|---|---|---|
250 |
2 |
6 |
60 minutes (without the preparation steps) |
1000 |
2 |
6 |
5 hours |
1500 |
2 |
6 |
greater than 5 hours |
|
Note
|
The conversion host flavor was set to 12GB of RAM and 6 vCPUs, which allows the VMware Migration Kit to comfortably run 6 migrations in parallel on the same host. There is capacity to execute more parallel migrations with this configuration, but it is a best practice to allocate 2GB of RAM and 1 vCPU for each migration. |
2.32.5. Conversion host requirements and recommendations
Recommended guidelines:
-
For 1 migration, allocate 2GB of RAM and 1 vCPU on your conversion host.
-
Use CentOS Stream 9 (or RHEL 9.5 and later) to provide the drivers (virtio-win version 1.40 or higher) required for converting Windows distributions.
-
Use Fedora 38 and later if you need to convert btrfs file systems.
-
Minimum baseline for small concurrency: 2 vCPUs, 4GB RAM, 16GB disk on the conversion host.
2.32.6. Factors affecting migration performance
The following factors affect migration performance:
-
Disk size and data volume: Larger disks take longer to transfer and convert.
-
Network bandwidth: Bandwidth between the conversion host and VMware ESXi hosts affects data transfer speed.
-
Disk I/O performance: Faster storage on the conversion host improves conversion speed.
-
OpenStack API performance: Higher API concurrency requires adequate RabbitMQ, Galera, Nova, and Cinder resources.
-
Parallelization: More threads per conversion host and more conversion hosts reduce total migration time.
-
CBT usage: CBT adds initial seeding time but reduces downtime during cutover.
-
VM complexity: Multi-disk VMs and VMs with many network interfaces take longer to migrate.
2.33. Post-migration script hooks
After you migrate virtual machines from VMware to OpenStack, the VMs can fail to start or lose network connectivity due to hypervisor-specific configurations. You can incorporate scripting to assist in the following areas:
- Network Interface Drift
-
VMware and OpenStack can have different interface names. You can use a script to remap MAC addresses to preserve connectivity.
- Different Driver Configurations
-
VMware Tools, drivers, and configurations are incompatible with OpenStack. You can use a script to reconfigure the guest operating system.
- Zero-Touch Automation
-
Manual post-migration fixes do not scale. You can use script hooks to automate migrations.
- Reduced Downtime
-
You should fix issues before or during migration, not after. You can use a script to ensure that VMs are properly configured before they start in OpenStack.
2.33.1. Levels of migration hooks
There are two levels of migration hooks:
-
Migration playbooks at the Ansible automation level that run before and after migration.
-
Hooks on the guest operating system that run during conversion or at first boot.
2.33.2. Overview of script hooks
| Level of hook | Type of hook | When the hook runs | Use case |
|---|---|---|---|
Ansible / AWX |
Pre-migration playbook |
Before migration |
Preparing environment, validation, approvals. |
Ansible / AWX |
Post-migration playbook |
After migration |
Verification, DNS updates, notifications. |
Guest operating system |
During virt-v2v conversion |
During virt-v2v conversion |
Network configuration, driver removal. |
Guest operating system |
First boot script |
First start in OpenStack |
Agent installation, registration. |
2.33.3. Ansible-level hooks
You can create custom playbooks that run before or after the migration:
Pre-migration playbook
Run validation checks, create approval tickets, or perform environment preparation before migration:
- name: Pre-migration validation
  hosts: migrator
  tasks:
    - name: Validate OpenStack quotas
      # Custom tasks here

    - name: Create change management ticket
      # Custom tasks here

- name: Run migration
  ansible.builtin.import_playbook: os_migrate.vmware_migration_kit.migration
Post-migration playbook
Run verification checks, update DNS records, or send notifications after migration:
- name: Run migration
  ansible.builtin.import_playbook: os_migrate.vmware_migration_kit.migration

- name: Post-migration tasks
  hosts: migrator
  tasks:
    - name: Verify instances are running
      # Custom tasks here

    - name: Update DNS records
      # Custom tasks here

    - name: Send notification
      # Custom tasks here
2.33.4. Guest operating system hooks
Guest-level hooks run inside the VM during conversion or at first boot.
During virt-v2v conversion
The virt-v2v tool supports customization scripts that run during the conversion process. These scripts can:
-
Remove VMware Tools
-
Reconfigure network interfaces
-
Update driver configurations
-
Modify system configurations for the OpenStack platform
Use the v2v_extra_opt variable to pass custom virt-v2v options.
First boot script
A first boot script executes when the VM starts for the first time after migration in OpenStack. This script can:
-
Install OpenStack guest agents (for example, cloud-init, qemu-guest-agent)
-
Remove VMware-specific configurations
-
Install monitoring or management agents
-
Perform post-migration validation checks
-
Update system configurations
See Scripting for post-migration VM start for details on creating and using first boot scripts.
2.33.5. When to use each type of hook
Use Ansible-level pre-migration hooks when you need to:
-
Validate the environment before migration
-
Create approval workflows
-
Prepare the destination cloud (create networks, security groups, flavors)
-
Gather inventory data for reporting
Use Ansible-level post-migration hooks when you need to:
-
Verify migration success
-
Update external systems (DNS, IPAM, CMDB)
-
Send notifications
-
Clean up temporary resources
Use guest-level conversion hooks when you need to:
-
Remove hypervisor-specific drivers or agents
-
Reconfigure network interfaces
-
Update bootloader configurations
Use guest-level first boot hooks when you need to:
-
Install cloud-init or other guest agents
-
Register with configuration management systems
-
Perform post-migration health checks
-
Update system configurations based on OpenStack metadata
2.34. Scripting for post-migration VM start
You can create a script that runs when the VM starts for the first time after migration. Include logic in your script to load OpenStack drivers, remove VMware Tools, install monitoring agents, and complete other important post-migration tasks.
-
You have access to the conversion host to upload the first boot script.
-
The script is compatible with the guest operating system of the VMs being migrated.
-
Create your first boot script. The script should be idempotent and include logging:
#!/bin/bash # post-migration-firstboot.sh LOG="/var/log/migration-firstboot.log" exec > >(tee -a "$LOG") 2>&1 echo "=== First Boot: $(date) ===" # Check if this script has already run if [ -f /var/log/migration-complete ]; then echo "Migration script already completed. Exiting." exit 0 fi # Example: Remove VMware Tools (if present) if rpm -q open-vm-tools; then echo "Removing VMware Tools..." yum remove -y open-vm-tools fi # Example: Install cloud-init for OpenStack if ! rpm -q cloud-init; then echo "Installing cloud-init..." yum install -y cloud-init fi # Example: Configure cloud-init for OpenStack cat > /etc/cloud/cloud.cfg.d/99-openstack.cfg <<EOF datasource_list: [ OpenStack ] datasource: OpenStack: metadata_urls: ['http://169.254.169.254'] max_wait: 120 timeout: 10 EOF # Example: Install qemu-guest-agent if ! rpm -q qemu-guest-agent; then echo "Installing qemu-guest-agent..." yum install -y qemu-guest-agent systemctl enable qemu-guest-agent systemctl start qemu-guest-agent fi # Mark the script as completed touch /var/log/migration-complete echo "=== Migration first boot script completed: $(date) ===" -
Copy the script to the conversion host:
scp -i <ssh-key> post-migration-firstboot.sh \ cloud-user@<conversion-host-ip>:/opt/scripts/ -
Set the correct permissions on the conversion host:
ssh -i <ssh-key> cloud-user@<conversion-host-ip> \ "chmod 755 /opt/scripts/post-migration-firstboot.sh" -
Set the variable in your
myvars.ymlfile:v2v_first_boot_script: "/opt/scripts/post-migration-firstboot.sh" -
Run the migration as described in Migrating from VMware to OpenStack.
You can copy the first boot script to the conversion host as part of the migration playbook:
- name: Migrate with Custom First Boot Script
  hosts: conversion_host
  vars:
    v2v_first_boot_script: "/opt/scripts/post-migration-firstboot.sh"
    vms_list:
      - VM1
      - VM2

  pre_tasks:
    - name: Create scripts directory
      ansible.builtin.file:
        path: /opt/scripts
        state: directory
        mode: '0755'
      become: true

    - name: Copy first boot script to conversion host
      ansible.builtin.copy:
        src: files/post-migration-firstboot.sh
        dest: "{{ v2v_first_boot_script }}"
        mode: '0755'
      become: true

  tasks:
    - name: Run migration with first boot script
      ansible.builtin.include_role:
        name: os_migrate.vmware_migration_kit.import_workloads
      loop: "{{ vms_list }}"
      loop_control:
        loop_var: vm
      vars:
vm_name: "{{ vm }}"-
After the migration completes and the instance boots for the first time, log in to the instance and check the first boot script log:
cat /var/log/migration-firstboot.log -
Verify that the completion marker file exists:
ls -l /var/log/migration-complete -
Check that the expected changes were applied (for example, cloud-init installed, VMware Tools removed):
rpm -q cloud-init qemu-guest-agent
rpm -q open-vm-tools
-
Remove VMware Tools and install OpenStack guest agents
-
Configure cloud-init for OpenStack metadata service
-
Update network interface configurations
-
Install monitoring agents (for example, Prometheus node exporter, Datadog agent)
-
Register with configuration management systems (for example, Ansible Tower, Puppet, Chef)
-
Perform system updates and security hardening
-
Set up log forwarding to centralized logging systems
-
Configure time synchronization (NTP/chrony)
-
Update SSH configurations and authorized keys
-
Run compliance checks and report results
2.36. Connectivity from conversion host to source environment
If you experience network connectivity issues between your conversion host and your source VMware environment, ensure that the network and name resolution are properly configured before running migrations.
2.36.1. Testing port 902 connectivity
Port 902 must be reachable from the conversion host for direct disk access to VMware ESXi hosts.
You can test the connectivity using the curl command:
curl -v telnet://<vcenter_ip>:902You can test the connectivity using the Netcat command:
nc -zv <vcenter_ip> 902Replace <vcenter_ip> with the IP address of the vCenter server or ESXi host.
The connection should succeed. If the connection fails, check firewall rules and network routing between the conversion host and the VMware environment.
2.36.2. Resolving vCenter FQDN
Ensure the vCenter hostname resolves from the conversion host. If the vCenter FQDN fails to resolve, update the /etc/hosts file:
echo "<vcenter_ip> vcenter.domain.local" | sudo tee -a /etc/hostsReplace <vcenter_ip> with the IP address of the vCenter server and vcenter.domain.local with the actual FQDN.
Verify the resolution:
ping -c 3 vcenter.domain.local2.36.3. Testing port 443 connectivity
Port 443 must be reachable from the conversion host for VMware vCenter API communication.
Test the connectivity:
curl -v -k https://<vcenter_ip>You should see an HTML response or a certificate error (which is expected if using self-signed certificates).
2.36.4. Common network issues
-
Firewall rules: Ensure firewall rules on the conversion host, VMware environment, and intermediate network devices allow traffic on ports 443 and 902.
-
Network routing: Verify that the conversion host can route traffic to the VMware management network and ESXi host networks.
-
DNS resolution: If using FQDNs instead of IP addresses, ensure DNS resolution works from the conversion host.
-
Proxy settings: If the conversion host is behind a proxy, ensure the proxy is configured correctly or add the VMware environment to the no-proxy list.
-
VPN or tunneling: If the conversion host and VMware environment are in different networks, ensure VPN or network tunneling is configured correctly.
2.36.5. Verification steps
-
From the conversion host, verify network connectivity to the vCenter server:
ping -c 3 <vcenter_ip> -
Verify port 443 (vCenter API) is accessible:
curl -v -k https://<vcenter_ip> -
Verify port 902 (ESXi direct disk access) is accessible:
nc -zv <vcenter_ip> 902 -
Verify DNS resolution (if using FQDNs):
nslookup vcenter.domain.local -
Test SSH connectivity to the conversion host from the migrator host:
ssh -i <ssh-key> cloud-user@<conversion-host-ip> uptime
If all tests pass, network connectivity is correctly configured for migration.
2.37. Unreachable metadata service
If the OpenStack metadata service is not reachable from the conversion host or migrated instances, you might see errors during migration or instance boot.
2.37.1. Symptoms
You might see errors such as the following:
Failed to fetch metadata: Get "http://169.254.169.254/openstack/latest/meta_data.json": dial tcp 169.254.169.254:80: connect: no route to host
This error indicates that the instance cannot reach the metadata service at the link-local address 169.254.169.254.
2.37.2. Causes
-
The OpenStack metadata service is not configured or is not running.
-
Network routing on the compute node does not direct metadata requests to the metadata service.
-
The instance’s network interface is not configured correctly to route link-local traffic.
-
Firewall rules on the compute node or network are blocking metadata service access.
-
The Neutron metadata agent is not running or is misconfigured.
2.37.3. Workaround during migration
If the metadata service is not reachable during migration, you can set a manual instance UUID in the migration variables:
import_workloads_instance_uuid: <uuid>Replace <uuid> with a UUID you generate or specify manually.
Generate a UUID:
uuidgenExample:
import_workloads_instance_uuid: f47ac10b-58cc-4372-a567-0e02b2c3d479This workaround allows the migration to proceed without relying on the metadata service for instance UUID retrieval.
2.37.4. Permanent fix
To resolve the underlying issue, ensure the OpenStack metadata service is properly configured:
-
Verify that the Neutron metadata agent is running on the network or compute nodes:
systemctl status neutron-metadata-agent -
Check the Neutron metadata agent configuration (
/etc/neutron/metadata_agent.ini):[DEFAULT] nova_metadata_host = <nova-api-host> nova_metadata_port = 8775 metadata_proxy_shared_secret = <shared-secret> -
Verify that the metadata proxy is enabled in the Neutron DHCP agent configuration (
/etc/neutron/dhcp_agent.ini):[DEFAULT] enable_metadata_network = True -
Restart the Neutron services after configuration changes:
systemctl restart neutron-metadata-agent systemctl restart neutron-dhcp-agent -
Verify that instances can reach the metadata service:
curl http://169.254.169.254/openstack/latest/meta_data.json
If the metadata service is correctly configured, instances should be able to retrieve metadata at boot time.
2.38. NBDKit errors
You might encounter NBDKit errors during VMware disk migration. These errors typically indicate issues with VMware connectivity, VDDK library configuration, or disk access.
2.38.1. Common NBDKit error
You might encounter an NBDKit error such as the following:
nbdkit: error: server has no export named '': No such file or directory
2.38.2. Potential causes
The following are potential causes for this NBDKit error:
-
Port 902 is not open or is not reachable between the conversion host and the VMware ESXi hosts or vCenter.
-
The vCenter FQDN is not resolvable from the conversion host.
-
The
nbdkitcommand has invalid characters or parameters in the VMDK path. -
The VMware VDDK library is not installed or is not in the expected location.
-
The VMDK path returned by the VMware API is incorrect or inaccessible.
-
The VMware datastore is not accessible from the ESXi host.
-
Permissions are insufficient for the vCenter user to access the VMDK.
2.38.3. Troubleshooting steps
-
Verify network connectivity to port 902:
nc -zv <vcenter_ip> 902If the connection fails, check firewall rules and network routing.
-
Verify vCenter FQDN resolution:
nslookup vcenter.domain.localIf resolution fails, add an entry to
/etc/hostson the conversion host:echo "<vcenter_ip> vcenter.domain.local" | sudo tee -a /etc/hosts -
Verify that the VDDK library is installed on the conversion host:
ls -l /usr/lib/vmware-vix-disklibIf the library is missing, download and install the VMware VDDK from the VMware website.
-
Check the VDDK library path in the migration variables:
conversion_host_vmware_vix_disklib: /usr/lib/vmware-vix-disklib # or import_workloads_libdir: /usr/lib/vmware-vix-disklib -
Review the nbdkit command in the debug logs to verify the VMDK path:
grep "nbdkit" /tmp/osm-nbdkit-<vm-name>-<random-id>.log -
Verify that the VMDK path is correct and accessible from the VMware environment.
-
Check vCenter user permissions. Ensure the user has the following privileges:
-
Datastore: Browse datastore
-
Virtual Machine: Provisioning (Allow disk access, Allow read-only disk access, Allow virtual machine download)
-
See Migration prerequisites for details on required vCenter ACLs.
2.38.4. Other NBDKit errors
Connection refused
nbdkit: error: connect: Connection refused
This error indicates that the NBDKit server cannot connect to the VMware ESXi host or vCenter. Verify network connectivity and firewall rules.
Authentication failed
nbdkit: error: vddk: VixDiskLib: Authentication failed
This error indicates that the VMware credentials are invalid or the vCenter user does not have sufficient permissions. Verify the credentials in the secrets.yml file.
File not found
nbdkit: error: vddk: VixDiskLib: Failed to open disk: The system cannot find the file specified
This error indicates that the VMDK file path is incorrect or the datastore is not accessible. Verify the VMDK path in the VMware environment.
VDDK library not found
nbdkit: error: cannot open shared object file: libvixDiskLib.so: cannot open shared object file: No such file or directory
This error indicates that the VDDK library is not installed or is not in the library path. Install the VDDK and ensure the path is correctly configured.
2.38.5. Manual testing
To test NBDKit manually, run the command shown in the debug logs with the --verbose flag:
nbdkit --verbose vddk \
  server=<vcenter_hostname> \
  user=<vcenter_username> \
  password=<vcenter_password> \
  thumbprint=<vddk_thumbprint> \
  file="[Datastore1] VM1/VM1.vmdk" \
  libdir=/usr/lib/vmware-vix-disklib
If the NBDKit server starts successfully, you should see output similar to:
nbdkit: debug: registered plugin: name=vddk ...
nbdkit: vddk[1]: config_complete
nbdkit: vddk[1]: thread_model=2 (serialize_all_requests)
Press Ctrl+C to stop the NBDKit server.
If NBDKit fails to start, review the error messages for clues about the underlying issue.
2.39. TLS certificate verification errors
If the VMware vCenter or the OpenStack API endpoint uses a self-signed certificate, or one issued by an authority not trusted by the conversion host, the migration fails with an error similar to the following:
Failed to initiate Vmware client: Post "https://vcenter.example.com/sdk": tls: failed to verify certificate: x509: certificate signed by unknown authorityTo bypass certificate verification, set one or both of the following variables:
# Skip TLS verification for the VMware vCenter connection:
import_workloads_vmware_insecure: true

# Skip TLS verification for the OpenStack API connection:
import_workloads_openstack_insecure: true
Both variables default to false. Set only the variable that applies to your environment, or both if required.
|
Warning
|
Disabling certificate verification removes protection against man-in-the-middle attacks. Use these options only in lab environments or on networks that you fully control. |
2.40. Enabling debugging flags during migration
You can increase the verbosity of the logs to assist your troubleshooting by setting debugging parameters in your migration variables.
2.40.1. Enabling debug mode
Set the following parameter in your myvars.yml file:
import_workloads_debug: trueThis enables verbose logging for the migration process, including detailed output from nbdkit, nbdcopy, virt-v2v, and OpenStack API calls.
2.40.2. Log file locations
When you migrate successfully, the migration log file is located on the conversion host in the /tmp directory.
If the migration fails, the log file is automatically pulled back to the migration working directory (default: /opt/os-migrate) on the migrator host.
The name of the log file is usually in the format:
osm-nbdkit-<vm-name>-<random-id>.log
where:
<vm-name>-
The name of the VM that was migrated.
<random-id>-
A random string generated for the migration.
2.40.3. Viewing logs during migration
To view logs in real-time during migration, log in to the conversion host and tail the log file:
ssh -i <ssh-key> cloud-user@<conversion-host-ip>
tail -f /tmp/osm-nbdkit-<vm-name>-<random-id>.log
Replace <vm-name> with the actual VM name. You can use wildcards to find the log file:
tail -f /tmp/osm-nbdkit-*.log2.40.4. Viewing logs after migration
If the migration failed, the log file is stored on the migrator host under the VM directory:
cat /opt/os-migrate/<vm-name>/osm-nbdkit-<vm-name>-<random-id>.log2.40.5. What to look for in debug logs
When troubleshooting with debug logs, look for:
-
NBDKit connection errors: Indicate problems connecting to VMware ESXi hosts or vCenter.
-
VDDK library errors: Indicate missing or incompatible VMware VDDK library.
-
OpenStack API errors: Indicate problems creating volumes, instances, ports, or other resources.
-
Network errors: Indicate connectivity issues between the conversion host and VMware or OpenStack.
-
Disk conversion errors: Indicate problems during the virt-v2v conversion process.
-
Authentication errors: Indicate invalid credentials for VMware or OpenStack.
2.40.6. Additional debugging options
For even more verbose output, you can add the following to v2v_extra_opt:
v2v_extra_opt: "-v -x"This enables verbose and debug mode in virt-v2v.
2.40.7. Example debug workflow
-
Enable debug mode in
myvars.yml:import_workloads_debug: true -
Run the migration:
ansible-playbook -i inventory.yml \ os_migrate.vmware_migration_kit.migration \ -e @secrets.yml -e @myvars.yml -
If the migration fails, locate the log file on the migrator host:
find /opt/os-migrate -name "osm-nbdkit-*.log" -
Review the log for error messages:
grep -i error /opt/os-migrate/<vm-name>/osm-nbdkit-<vm-name>-<random-id>.log -
Search for common issues:
grep -i "connection refused\|authentication failed\|no such file\|permission denied" \ /opt/os-migrate/<vm-name>/osm-nbdkit-<vm-name>-<random-id>.log -
Address the identified issues and re-run the migration.
2.41. Debugging manually
You can use the following commands to manually troubleshoot migration issues by replaying the nbdkit and nbdcopy commands outside of the Ansible playbook.
2.41.1. Manual debugging workflow
The migration process uses two main commands: nbdkit to expose the VMware VMDK as an NBD export, and nbdcopy to copy the data from the NBD export to the OpenStack Cinder volume.
You can run these commands manually to isolate issues and gather additional debugging information.
2.41.2. Step 1: Run nbdkit manually
Run the nbdkit command shown in the migration logs with the --verbose flag and enclose the VMDK path in double quotes:
nbdkit --verbose vddk \
  server=<vcenter_hostname> \
  user=<vcenter_username> \
  password=<vcenter_password> \
  thumbprint=<vddk_thumbprint> \
  file="[Datastore1] VM1/VM1.vmdk" \
  libdir=/usr/lib/vmware-vix-disklib
Replace the placeholders with actual values from your environment:
-
<vcenter_hostname>: vCenter server hostname or IP address -
<vcenter_username>: vCenter username (for example,rootoradministrator@vsphere.local) -
<vcenter_password>: vCenter password -
<vddk_thumbprint>: SSL thumbprint of the vCenter or ESXi server -
[Datastore1] VM1/VM1.vmdk: VMDK path as returned by the VMware API
|
Note
|
If the migration snapshot has been deleted, remove the snapshot reference from the VMDK path and use the base disk instead. For example, change |
The NBDKit server starts and listens on the default port (10809). You should see output similar to:
nbdkit: debug: registered plugin: name=vddk version=1.32.5 ...
nbdkit: vddk[1]: config_complete
nbdkit: vddk[1]: thread_model=2 (serialize_all_requests)
nbdkit: bound to 127.0.0.1 port 10809
Leave this terminal open and proceed to the next step in a different terminal session.
2.41.3. Step 2: Run nbdcopy in another shell
In another shell on the conversion host, run the nbdcopy command as shown in the migration logs:
nbdcopy nbd://localhost:10809 /dev/mapper/cinder-volumeObserve the nbdkit output in the first terminal. You should see:
vddk: config_complete.
This indicates that NBDKit successfully connected to the VMware VMDK and is ready to serve data.
If the nbdcopy command succeeds, data is copied from the VMware VMDK to the destination volume. You should see progress indicators and eventually a completion message.
2.41.4. Step 3: Analyze authentication and paths
At this point, authentication was already verified by the migration process. The VMDK path is returned by the VMware API and is typically in the format:
[Datastore 1] path/to/the/guest-00001.vmdk
If the manual commands work but the migration fails, the issue is likely in the Ansible playbook logic or variable handling, not in the underlying nbdkit or VDDK configuration.
If the manual commands fail, the error messages from nbdkit and nbdcopy provide clues about the underlying issue (for example, network connectivity, authentication, VMDK path, VDDK library).
2.41.5. Common issues identified through manual debugging
-
VMDK path contains special characters: Ensure the VMDK path is properly quoted in the nbdkit command.
-
Snapshot no longer exists: If a snapshot was created during migration but has since been deleted, use the base VMDK path instead.
-
Authentication timeout: If the vCenter or ESXi server is slow to respond, the authentication may timeout. Increase the timeout or verify network latency.
-
VDDK library version mismatch: Ensure the VDDK library version is compatible with the vCenter and ESXi versions.
-
Datastore not accessible: Ensure the datastore containing the VMDK is accessible from the ESXi host.
2.41.6. Gathering VDDK thumbprint
If you need to obtain the VDDK thumbprint for the vCenter or ESXi server, run:
openssl s_client -connect <vcenter_hostname>:443 </dev/null 2>/dev/null | \
  openssl x509 -noout -fingerprint -sha1
Example output:
SHA1 Fingerprint=01:23:45:67:89:AB:CD:EF:01:23:45:67:89:AB:CD:EF:01:23:45:67
Use the fingerprint value (with colons) as the vddk_thumbprint parameter.
2.41.7. Cleaning up after manual testing
After manual testing, stop the nbdkit server in the first terminal by pressing Ctrl+C.
If you created test volumes or instances during manual testing, clean them up:
openstack volume delete <test-volume-id>
openstack server delete <test-instance-id>
2.41.8. When to use manual debugging
Use manual debugging when:
-
The migration fails with nbdkit or nbdcopy errors and you need to isolate the root cause.
-
You want to verify VDDK library installation and configuration.
-
You need to test VMware connectivity outside of the Ansible playbook.
-
You want to measure data transfer performance between VMware and OpenStack.
-
You are developing or testing custom migration scripts.
3. Migrating workloads between OpenStack clouds
OS Migrate copies tenant content between OpenStack clouds using the official OpenStack API. This guide describes how to prepare the clouds, deploy the conversion hosts, migrate the supporting resources, and migrate the workloads. For the components shared with other migration types, see the common reference at the end of this guide.
3.1. Overview
3.1.1. OpenStack to OpenStack migration overview
OS Migrate is a framework for OpenStack parallel cloud migration, that is, migrating content between OpenStack tenants that are not necessarily in the same cloud. It is a collection of Ansible playbooks that provide the basic functionality. Because the playbooks might not fit every use case out of the box, you can craft custom playbooks using the OS Migrate collection pieces (roles and modules) as building blocks.
Parallel cloud migration
Parallel cloud migration is a way to renew an OpenStack deployment. Instead of upgrading an OpenStack cluster in place, a second OpenStack cluster is deployed alongside it, and tenant content is migrated from the original cluster to the second one. Parallel cloud migration suits environments that are due for a hardware refresh cycle. It can also be performed without a hardware refresh, but extra hardware resources are required to bootstrap the second cluster. As hardware resources free up in the original cluster, they can be added to the second cluster.
OS Migrate uses the official OpenStack API only. It does not use direct database access or other methods to export or import data. The Ansible playbooks are idempotent: if a command fails, you can retry with the same command.
Migration sequence
A migration is performed in this sequence:
-
Prerequisites: prepare authentication information and parameter files. See Preparing the clouds and parameter files.
-
Pre-workload migration: copy the supporting resources into the destination cloud (for example networks, security groups, and images) while workloads keep running in the source cloud. See Exporting and importing pre-workload resources.
-
Workload migration: stop the use of the applicable resources in the source cloud and move them into the destination cloud (instances and volumes). See Migrating workloads.
For the roles that run the migration, see Migrator host requirements and Conversion hosts. For collection installation, see Installing the OS Migrate collections. For terminology, see OS Migrate glossary.
3.1.2. OpenStack to OpenStack features
OS Migrate copies tenant content between OpenStack clouds using the official OpenStack API. This reference lists the resources it migrates and the capabilities available for each stage of the migration.
Supported resources
The following resources are exported from the source cloud and imported into the destination cloud. Each resource type has a matching export playbook and import playbook.
| Resource | Description |
|---|---|
Networks |
Neutron networks. |
Subnets |
Neutron subnets. |
Routers |
Neutron routers. |
Router interfaces |
Interfaces that connect routers to subnets. |
Security groups |
Neutron security groups. |
Security group rules |
Rules that belong to security groups. |
Images |
Glance images. |
Keypairs |
Nova keypairs, including per-user keypair export with admin privileges. |
Flavors |
Nova flavors. |
Projects |
Keystone projects. |
Users |
Keystone users. |
User project role assignments |
Keystone role assignments between users and projects. |
Detached volumes |
Cinder volumes that are not attached to an instance. |
| Resource | Description |
|---|---|
Workloads (instances) |
Nova servers, including their boot disks and attached volumes, transferred through the conversion hosts. |
Migration capabilities
- Resource filtering
-
Control which resources are migrated with per-resource-type filters that match names by string or regular expression, during both export and import. See Variables reference.
- Editable serializations
-
Edit the exported YAML files to adjust resource properties before import, and set per-resource migration parameters. See Migration parameters reference.
- Idempotent playbooks
-
Retry a failed command with the same command. Existing resources in the destination are detected and not recreated.
- Boot disk handling
-
Copy the source boot disk into a destination volume, or re-image the destination server from a Glance image of the same name. See Migration parameters reference.
- Storage migration modes
-
Copy volume data with OS Migrate, or attach pre-created destination volumes without copying. See Migration parameters reference.
- NBD source migration
-
Transfer volume data directly from the source hypervisor to the destination conversion host using
qemu-nbd, bypassing the source conversion host. Supports multiple disks per instance, including boot and ephemeral disks. See NBD source migration. - Floating IP handling
-
Skip, create new, attach existing, or attempt existing then fall back to new. See Migration parameters reference.
- Conversion host customization
-
Customize conversion host names, images, flavors, networking, floating IPs, boot-from-volume, RHEL registration, custom scripts, and password-based access. See Conversion host variables reference.
- TLS configuration
-
Configure certificate validation and client authentication for the source and destination API endpoints. See Variables reference.
3.1.3. How workload migration works
Knowing how workload migration works under the hood is not required to use OS Migrate, but it helps with troubleshooting and with forming a deeper understanding of the tool. For the conversion host concept, see Conversion hosts.
Data flow
Workload migration uses conversion hosts to transfer data from the source cloud to the destination cloud. A conversion host is deployed temporarily in both the source and destination projects. Being in the same project as the source instances (and destination, respectively) ensures that the conversion hosts can access the data that needs to be migrated (snapshots and volumes).
The volumes on the source and destination clouds are detached from their original instances and attached to their respective conversion hosts, then transferred over the network from the source conversion host to the destination conversion host. The tooling inside the conversion host migrates one server by automating the following actions.
On the source cloud:
-
Detach the volumes from the target server.
-
Attach the volumes to the source conversion host.
-
Export the volumes as block devices and wait for the destination conversion host to connect.
On the destination cloud:
-
Create new volumes on the destination conversion host, one for each source volume.
-
Attach the new volumes to the destination conversion host.
-
Connect to the block devices exported by the source conversion host and copy the data to the new attached volumes.
-
Detach the volumes from the destination conversion host.
-
Create a new server using the new volumes.
This method keeps broad compatibility with the various flavors and configurations of OpenStack, using an API-only approach as much as possible, while allowing the use of libguestfs-based tooling to minimize total data transfer.
Migration sequence
The export_workloads.yml playbook exports workload metadata into workloads.yml. The main migration sequence
happens inside the import_workloads.yml playbook and the import_workloads role. The initial common steps are:
-
The resources loaded from
workloads.ymlare validated. -
Resources are filtered according to
os_migrate_workloads_filter. -
Reachability of the source and destination conversion hosts is verified.
With the default storage migration mode (data_copy set to true), the role iterates over all workloads that passed
the filter. For each workload (a Nova server), the following steps run:
-
The
import_workload_prelimmodule creates log and state files under{{ os_migrate_data_dir }}/workload_logs. It skips migration of instances that already exist in the destination, and skips conversion hosts. -
The
import_workload_dst_checkmodule verifies that migration prerequisites are satisfied in the destination cloud, that is, that resources referenced by name from the workload serialization (networks, subnets, and so on) exist in the destination cloud. -
If
os_migrate_workload_stop_before_migrationistrue, the instance in the source cloud is stopped. -
The
import_workload_src_checkmodule verifies that the source workload is ready to be migrated, that is, that the Nova server isSHUTOFF. -
The
import_workload_export_volumesmodule prepares data for transfer to the destination cloud:-
If
boot_disk_copyistrue, a snapshot of the source instance is created, converted to a Cinder volume, and attached to the source conversion host. -
Additional Cinder volumes attached to the source instance are detached from it and attached to the source conversion host.
-
All of the instance volumes (boot and additional) on the conversion host are exported as NBD drives, listening on localhost only.
-
-
The
import_workload_transfer_volumesmodule copies data from the source to the destination:-
SSH port forwarding is created for the NBD drives of the source conversion host, so that they are accessible on the destination conversion host, again on localhost only. The data transfer mechanism can be described as NBD over SSH.
-
Cinder volumes are created in the destination project for both the boot disk and additional volumes, as applicable. The destination volume sizes match the volume sizes in the source cloud. The volumes are attached to the destination conversion host.
-
Sparsification of the NBDs is performed, only for recognizable filesystems that the
virt-sparsifytool supports. This speeds up copying of empty space on supported filesystems. -
Data is copied from the NBDs to the respective destination Cinder volumes.
-
SSH port forwarding for the NBDs is closed, and volumes are detached from the destination conversion host.
-
-
The
import_workload_create_instancemodule creates a new Nova server in the destination cloud according to the resource serialization, using the copied Cinder volumes as applicable. -
The
import_workload_src_cleanupmodule cleans up after the migration in the source cloud. It closes the NBD exports, detaches volumes from the conversion host, deletes the temporary boot disk snapshot volume, and re-attaches any additional volumes back onto the source instance, as applicable. -
If a failure occurs during the migration, the
import_workload_src_cleanupmodule runs, and an additionalimport_workload_dst_failure_cleanupmodule runs to clean up the failed partial migration from the destination cloud. After a successful migration, no further cleanup is necessary in the destination cloud.
3.1.4. NBD source migration
NBD source migration consumes volume data directly from the source hypervisor using the NBD protocol and qemu-nbd.
Instead of routing data through a source conversion host, the migration connects directly to the compute node where the
instance lives, which reduces network hops and improves transfer performance. For the standard conversion host data
flow, see How workload migration works.
This approach suits environments where the destination conversion host has direct network access to the source hypervisors and you want to bypass the source conversion host. The feature supports multiple disks per instance, including boot volumes and ephemeral disks.
How it works
With the traditional migration path, data flows from the source instance through the source conversion host to the destination conversion host:
Source VM -> Source conversion host (SSH) -> Destination conversion host -> Destination volumes
With the NBD direct path, qemu-nbd runs on the hypervisor and the destination conversion host reads the disks
directly:
Source VM (on hypervisor) -> qemu-nbd on hypervisor -> Destination conversion host -> Destination volumes
The data flows directly from the hypervisor to the destination conversion host using nbdcopy, which eliminates the
intermediate source conversion host step.
When import_workloads detects use_nbdkit_direct: true in a workload definition, it changes the migration workflow:
-
Source conversion host operations are skipped entirely.
-
The
nbdkit_diskslist is read from the workload definition. -
One destination volume is created per disk and attached to the destination conversion host.
-
Each disk is copied from its NBD URI to its destination volume with
nbdcopy, instead ofqemu-img convert. -
Destination volumes are detached, and the instance is created with the new volumes.
Progress is tracked in the state file for each workload, so you can monitor the transfer.
Limitations
-
Only instances in the
SHUTOFFstate are supported. -
The destination conversion host requires direct network connectivity to the source hypervisors.
-
qemu-nbdprocesses remain running after migration. You might want to clean them up manually. -
The variable names use the
nbdkitprefix for backward compatibility, even though the implementation usesqemu-nbd.
3.2. Migration procedure
3.2.1. Preparing the clouds and parameter files
Before migrating resources, prepare authentication credentials and the parameter file that the OS Migrate playbooks read. Run the playbooks from a migrator host. See Migrator host requirements.
Authentication
Use credentials specific to each project or tenant. Do not use the admin user to run the resource migration, unless the resource is owned by the admin project, for example public Glance images.
If the circumstances require migrating with the admin user, this user needs access to the respective projects. There
are two options:
-
Add the
adminuser as amemberof each project. Depending on how many projects need to be migrated, this approach can be suboptimal, because it involves several configuration updates in the projects that must be reverted after the migration completes. -
Create a group that includes the admin user and add the group to each project as a member. With this approach, once the migration is complete, removing the group removes all the references in all the projects automatically.
Parameter file
-
Create an
os-migrate-vars.ymlfile with the Ansible variables for the source and destination credentials, the region names, and the data directory on the migrator host:os_migrate_src_auth: auth_url: http://192.168.0.13.199/v3 password: srcpassword project_domain_name: Default project_name: src user_domain_name: Default username: src os_migrate_src_region_name: regionOne os_migrate_dst_auth: auth_url: http://192.167.0.16:5000/v3 password: dstpassword project_domain_name: Default project_name: dst user_domain_name: Default username: dst os_migrate_dst_region_name: regionOne os_migrate_data_dir: /home/migrator/os-migrate-dataThe file contains the source and destination tenant credentials and a directory on the migrator host where the exported data is saved.
-
If you migrate content from multiple source projects, use a separate data directory for each source project. When you change
os_migrate_src_authoros_migrate_src_region_name, also changeos_migrate_data_dir. -
Save the collection path and the
ansible-playbookcommand as shell variables, because they are used routinely:export OSM_DIR=/home/migrator/.ansible/collections/ansible_collections/os_migrate/os_migrate export OSM_CMD="ansible-playbook -v -i $OSM_DIR/localhost_inventory.yml -e @os-migrate-vars.yml"
Keystone v2 authentication
The os_migrate_src_auth and os_migrate_dst_auth parameters in the preceding example use Keystone v3. To migrate
between tenants that do not support Keystone v3, the following error is raised:
keystoneauth1.exceptions.discovery.DiscoveryFailure: Cannot use v2 authentication with domain scope
To resolve this, adjust the authentication parameters. Remove project_domain_name and user_domain_name, and point
auth_url to the Keystone v2 endpoint:
os_migrate_src_auth:
  auth_url: http://192.168.0.13.199/v2.0
  password: srcpassword
  project_name: src
  username: src
os_migrate_src_region_name: regionOne
3.2.2. Deploying conversion hosts
Workload migration between OpenStack clouds uses two conversion hosts, one in the source cloud and one in the destination cloud. For the conversion host concept, see Conversion hosts. For the full list of conversion host variables, see Conversion host variables reference.
Roles
The conversion host system consists of two Ansible roles:
conversion_host-
Deploys the infrastructure and compute instances needed for the conversion hosts. It creates the networking infrastructure (networks, subnets, routers, and security groups), generates SSH keypairs, deploys the conversion host instances in both clouds, configures floating IPs, and sets up security group rules for SSH and ICMP access.
conversion_host_content-
Installs and configures software packages on the conversion hosts. It installs the operating system packages (for CentOS and RHEL), configures RHEL subscription management when required, sets up SSH keys for inter-host communication, enables password access when required, and runs pre-content and post-content hooks.
Network architecture
Source Cloud                 Destination Cloud
+------------------+        +------------------+
| Conversion Host  |        | Conversion Host  |
| (os_migrate_conv)|   SSH  | (os_migrate_conv)|
| 192.168.10.x     |<------>| 192.168.10.x     |
+------------------+        +------------------+
         |                           |
    [Floating IP]              [Floating IP]
         |                           |
    [External Net]             [External Net]
Prerequisites
-
A flavor adequate for conversion operations. A minimum of 2 vCPU and 4 GB RAM is recommended.
-
A compatible base image with cloud-init (CentOS or RHEL).
-
An external network for floating IP assignment.
-
Sufficient quota for additional instances, networks, and floating IPs.
-
OpenStack permissions for instance, network, security group, keypair, and floating IP management in both clouds.
-
A conversion host image available in Glance on both clouds. See Conversion host variables reference.
-
Add the flavor and external network for the conversion hosts to
os-migrate-vars.yml:os_migrate_conversion_external_network_name: public os_migrate_conversion_flavor_name: m1.large -
Deploy the conversion hosts. The playbook creates the servers, installs the required packages, and authorizes the destination conversion host to connect to the source conversion host for the data transfer:
$OSM_CMD $OSM_DIR/playbooks/deploy_conversion_hosts.ymlThe deployment creates the source conversion host infrastructure and instance, creates the destination conversion host infrastructure and instance, configures SSH linking between the hosts, installs the required software packages, and performs health checks.
-
(Optional) Deploy the roles directly for finer control:
- name: Deploy source conversion host
  include_role:
    name: os_migrate.os_migrate.conversion_host
  vars:
    os_migrate_conversion_cloud: src
    os_migrate_conversion_host_name: "{{ os_migrate_src_conversion_host_name }}"

- name: Deploy destination conversion host
  include_role:
    name: os_migrate.os_migrate.conversion_host
  vars:
    os_migrate_conversion_cloud: dst
    os_migrate_conversion_host_name: "{{ os_migrate_dst_conversion_host_name }}"
The os_conversion_host_info module provides runtime information about a conversion host:
- name: Get conversion host info
  os_migrate.os_migrate.os_conversion_host_info:
    cloud: src
    server: "{{ os_migrate_src_conversion_host_name }}"
  register: conversion_host_info
Troubleshooting
- Conversion host not reachable
-
The
os_conversion_host_infomodule fails if the host is notACTIVE. Verify the floating IP assignment and that the security group rules allow SSH on port 22. - Network connectivity issues
-
Verify that the external network name is correct, that the router gateway is set to the external network, and that the DNS nameservers are reachable.
- SSH key problems
-
The private key must have
0600permissions, the public key must be accessible to Ansible, and the keypair must exist in OpenStack. - Package installation failures
-
For RHEL, check the subscription configuration, verify repository access, and review the pre-content and post-content hooks.
To verify that the OpenStack resources exist:
openstack server list --name os_migrate_conv
openstack network list --name os_migrate_conv
openstack security group list --name os_migrate_conv
3.2.3. Exporting and importing pre-workload resources
Workloads require the support of several resources in a cloud to operate. These resources include networks, subnets, routers, router interfaces, security groups, security group rules, images, and keypairs. Pre-workload migration exports these resources from the source cloud onto the migrator host, allows optional edits, and imports them into the destination cloud while workloads keep running in the source cloud.
Each resource type has a matching export playbook and import playbook. The following steps use networks as a concrete example. The same pattern applies to the other supported resource types.
-
Export the networks from the source cloud:
$OSM_CMD $OSM_DIR/playbooks/export_networks.ymlThe export creates a
networks.ymlfile in the data directory:os_migrate_version: 0.17.0 resources: - _info: availability_zones: - nova created_at: '2020-04-07T14:08:30Z' id: a1eb31f6-2cdc-4896-b582-8950dafa34aa project_id: 2f444c71265048f7a9d21f81db6f21a4 status: ACTIVE subnet_ids: - a5052e10-5e00-432b-a826-29695677aca0 - d450ffd0-972e-4398-ab49-6ba9e29e2499 params: description: '' is_admin_state_up: true is_port_security_enabled: true is_router_external: false is_shared: false mtu: 1450 name: osm_net type: openstack.network.Network -
(Optional) Edit
networks.ymlto adjust the resources before importing them. -
Import the networks into the destination cloud:
$OSM_CMD $OSM_DIR/playbooks/import_networks.yml -
Repeat the export and import process for the other supporting resources, such as subnets, security groups, security group rules, routers, router interfaces, images, and keypairs.
To list the available playbooks:
ls $OSM_DIR/playbooksThe set of resources exported is limited to those visible with the authentication variables in use. To control which resources are migrated, use the resource filters described in Variables reference.
3.2.4. Migrating workloads
Workload migration exports instance metadata from the source cloud and transfers the instance data to the destination cloud through the conversion hosts. For the data flow, see How workload migration works. Before migrating workloads, deploy the conversion hosts. See Deploying conversion hosts.
-
The destination cloud contains all supporting resources referenced by the workloads (networks, security groups, flavors, and so on). Matching named resources must exist in the destination before the servers are created. See Exporting and importing pre-workload resources.
-
Conversion hosts are deployed in both the source and destination clouds.
-
Export the workload metadata:
$OSM_CMD $OSM_DIR/playbooks/export_workloads.ymlEach server listed in the resulting
workloads.ymlis migrated, except for the server that matches the name of the source conversion host. This playbook extracts only metadata about the servers in the tenant. It does not download volumes into the data directory. Data transfer is handled by the import step, directly between the clouds, so both clouds must be running and reachable at the same time.The resulting
workloads.ymlresembles the following:os_migrate_version: 0.17.0 resources: - _info: flavor_id: cd6258f9-c34b-4a9c-a1e2-8cb81826781e id: af615f8c-378a-4a2e-be6a-b4d38a954242 status: SHUTOFF _migration_params: boot_disk_copy: false params: availability_zone: nova flavor_ref: name: m1.xtiny image_ref: name: cirros-0.4.0-x86_64-disk.img key_name: osm_key name: osm_server ports: - params: fixed_ips_refs: - ip_address: 192.168.20.7 subnet_ref: name: osm_subnet network_ref: name: osm_net type: openstack.network.ServerPort security_group_refs: - name: osm_security_group type: openstack.compute.Server -
(Optional) Edit
workloads.ymlto adjust the properties of the servers created in the destination cloud, and to set the migration parameters that control how each workload is migrated. See Migration parameters reference. -
Migrate the workloads:
$OSM_CMD $OSM_DIR/playbooks/import_workloads.ymlA server marked
changedis migrated to the destination cloud. A server isskippedif it matches the name or ID of the conversion host. If a server matching the name of the current server already exists in the destination, it is markedokand no extra work is performed.
To alter the behavior of the migration, such as selecting a subset of workloads to export or import, use the Ansible variables described in Variables reference.
3.2.5. Migrating workloads directly from the source hypervisor
Use NBD source migration to transfer volume data directly from the source hypervisor to the destination conversion host, bypassing the source conversion host. For how this works, see NBD source migration. For the standard workload migration procedure, see Migrating workloads.
-
A conversion host is deployed in the destination cloud. See Deploying conversion hosts.
-
The destination conversion host has direct network connectivity to the source hypervisors on the
qemu-nbdports (10809 and higher by default). -
The workloads to migrate are in the
SHUTOFFstate.
-
Export the workload metadata from the source cloud:
$OSM_CMD $OSM_DIR/playbooks/export_workloads.yml -
Enable NBD direct mode for each workload to migrate this way, by adding the
use_nbdkit_directflag to the_migration_paramssection of the workload inworkloads.yml:- _info: id: abc-123-def-456 hypervisor_hostname: compute-01.example.com status: SHUTOFF params: name: my-instance _migration_params: use_nbdkit_direct: trueThe
hypervisor_hostnamefield is populated byexport_workloads. You can setuse_nbdkit_directafter export, or set it in your workload definitions before export. -
Spawn the
qemu-nbdprocesses on the source hypervisors:$OSM_CMD $OSM_DIR/playbooks/import_from_hypervisor.ymlFor each workload marked
use_nbdkit_direct: true, theimport_from_hypervisorrole verifies that the instance isSHUTOFF, connects to the hypervisor over SSH, discovers all disk files in/var/lib/nova/instances/<uuid>/(such asdisk,disk.eph0, anddisk.eph1), inspects each disk withqemu-img infoto detect its format and size, spawns oneqemu-nbdprocess per disk on sequential ports starting from 10809, and updatesworkloads.ymlwith thenbdkit_diskslist. Run this role after exporting workloads and before importing them. -
Verify that the
nbdkit_diskslist was added to each workload inworkloads.yml:- _info: id: abc-123-def-456 hypervisor_hostname: compute-01.example.com params: name: my-instance _migration_params: use_nbdkit_direct: true nbdkit_disks: - device: "/dev/vda" uri: "nbd://compute-01.example.com:10809" port: 10809 size: 10 bootable: true - device: "/dev/vdb" uri: "nbd://compute-01.example.com:10810" port: 10810 size: 10 bootable: falseEach entry represents one disk:
deviceis the device name on the destination instance,uriis the NBD URI to connect to,portis theqemu-nbdport number,sizeis the disk size in GB detected fromqemu-img info, andbootableindicates whether the disk is the boot disk. -
Migrate the workloads:
$OSM_CMD $OSM_DIR/playbooks/import_workloads.ymlFor workloads marked
use_nbdkit_direct: true,import_workloadsreads thenbdkit_diskslist, creates one destination volume per disk, attaches the volumes to the destination conversion host, copies each disk from its NBD URI withnbdcopy, detaches the volumes, and creates the instance with the new volumes.
To customize the role behavior, set the variables described in NBD source migration variables.
Preparing the hypervisor manually
To prepare the hypervisor without the import_from_hypervisor role, spawn the qemu-nbd processes yourself and update
workloads.yml.
-
Locate the instance directory on the hypervisor:
/var/lib/nova/instances/<uuid>/ ├── disk # Boot disk ├── disk.eph0 # Ephemeral disk 0 (if present) ├── disk.eph1 # Ephemeral disk 1 (if present) └── disk.info # Metadata file (not used)
-
Inspect each disk format:
qemu-img info /var/lib/nova/instances/<uuid>/disk -
Start
qemu-nbdfor each disk, using read-only mode and sequential ports:# Boot disk on port 10809 sudo qemu-nbd -f qcow2 -p 10809 --read-only \ /var/lib/nova/instances/<uuid>/disk # First ephemeral disk on port 10810 (if present) sudo qemu-nbd -f qcow2 -p 10810 --read-only \ /var/lib/nova/instances/<uuid>/disk.eph0 -
Update
workloads.ymlwith thenbdkit_disksstructure shown earlier, then continue with the standardimport_workloadsstep.
Security considerations
When using NBD source migration:
-
Ensure the instance is
SHUTOFFbeforeqemu-nbdstarts. Theimport_from_hypervisorrole enforces this check. To stop workloads automatically, setos_migrate_workload_stop_before_migration: true. -
Keep
qemu-nbdin read-only mode to prevent accidental writes to the source disks, by keepingos_migrate_nbdkit_readonly: true. -
Over untrusted networks, use the SSH protocol for encrypted transfers, by setting
os_migrate_nbdkit_protocol: sshandos_migrate_nbdkit_ssh_user. -
qemu-nbdbinds to all interfaces by default. Use firewall rules on the hypervisor to allow only the destination conversion host to connect to ports 10809 and higher.
3.2.6. Cleaning up conversion hosts
After the workloads in a tenant are migrated, remove the conversion hosts to release the compute, network, and floating IP resources that they consume.
-
Delete the conversion hosts in both clouds:
$OSM_CMD $OSM_DIR/playbooks/delete_conversion_hosts.ymlThe playbook removes the conversion host instances and their supporting infrastructure. Floating IP handling during deletion is controlled by the
os_migrate_src_conversion_host_delete_fipandos_migrate_dst_conversion_host_delete_fipvariables. See Conversion host variables reference. -
(Optional) Remove any exported data files from the data directory if they are no longer required. Keep a separate data directory for each source project. See Usage notes.
3.2.7. Upgrading OS Migrate
This procedure describes the recommended method of upgrading the os_migrate.os_migrate collection from Ansible
Galaxy. For a first-time installation, see Installing the OS Migrate collections.
-
To upgrade the collection when it is already installed, pass the
-fflag to force installation even if the collection is already present:ansible-galaxy collection install -f os_migrate.os_migrate -
To upgrade or downgrade to a specific release, specify the version:
ansible-galaxy collection install os_migrate.os_migrate:<VERSION>Available releases are listed on the OS Migrate Galaxy page.
Usage notes related to upgrading
-
OS Migrate does not guarantee forward compatibility of exported data. Use the same version of OS Migrate during export and import.
-
After upgrading, clear any existing data files from
os_migrate_data_dir, or use a different data directory. During export, OS Migrate parses existing data files to add new resources to them, and an error is raised if the existing data files were created with a different version. For the related error, see Troubleshooting.
3.3. Reference
3.3.1. Variables reference
This reference describes the most important variables used to configure OpenStack to OpenStack migration. For the complete list of variables configurable for each role, see the documentation of the individual roles. For conversion host variables, see Conversion host variables reference.
Resource filters
Resource filters control which resources are migrated. The filters match against resource names and apply both during export and during import. It is not required that the same value is used during export and import. For example, you can export a subset of the existing resources, and during import further limit the subset being imported into batches.
The value of a filter variable is a list. Each item is either a string (exact match) or a dictionary with a regex key
(regular expression match). A resource is exported if it matches at least one of the list items:
os_migrate_networks_filter:
  - my_net
  - other_net
  - regex: ^myprefix_.*
The preceding example exports only networks named my_net or other_net, or starting with myprefix_.
The filters default to the following, which means "export all resources". The set of resources exported is still limited to those visible with the authentication variables in use:
- regex: .*Some roles share the same variable where it makes sense, especially for attached resources. For example,
export_security_groups and export_security_group_rules both use os_migrate_security_groups_filter, and
export_routers and export_router_interfaces both use os_migrate_routers_filter.
The following filters are available, shown with their default values:
os_migrate_flavors_filter:
  - regex: .*
os_migrate_images_filter:
  - regex: .*
os_migrate_keypairs_filter:
  - regex: .*
os_migrate_networks_filter:
  - regex: .*
os_migrate_projects_filter:
  - regex: .*
os_migrate_routers_filter:
  - regex: .*
os_migrate_security_groups_filter:
  - regex: .*
os_migrate_subnets_filter:
  - regex: .*
os_migrate_users_filter:
  - regex: .*
os_migrate_workloads_filter:
  - regex: .*
OpenStack REST API TLS variables
If either cloud uses TLS endpoints that are not trusted by the migrator host by default, for example self-signed certificates, or if the migrator host must authenticate itself with a key and certificate, set the following variables.
os_migrate_src_validate_certs/os_migrate_dst_validate_certs-
Set to
falseto disable certificate validity checks of the source or destination API endpoints. os_migrate_src_ca_cert/os_migrate_dst_ca_cert-
Specify a custom CA certificate used to validate the source or destination API certificates.
os_migrate_src_client_cert,os_migrate_src_client_key/os_migrate_dst_client_cert,os_migrate_dst_client_key-
Set these when the migrator host must authenticate itself with a TLS key and certificate when connecting to the source or destination APIs.
Workload import and export variables
os_migrate_workload_stop_before_migration-
Set to
trueto stop workloads before migration. Only workloads in theSHUTOFFstate are migrated.
Storage migration mode
os_migrate_workloads_data_copy-
Controls the storage migration mode for workloads. The default is
true, which means OS Migrate performs the data copy. Set it tofalseto skip the OS Migrate data copy, which is useful when the destination cloud contains pre-created volumes to attach when creating the instance in the destination. This variable sets the default for the per-workloaddata_copymigration parameter. See Migration parameters reference.
3.3.2. Conversion host variables reference
This reference describes the variables that configure the conversion hosts used for workload migration. Configure these variables before running the conversion host deployment. For the conversion host concept, see Conversion hosts. For the deployment procedure, see Deploying conversion hosts.
Conversion host name
The conversion hosts can be configured with different names, for example when an operator registers them with subscription management and needs to avoid name collisions:
os_migrate_src_conversion_host_name
os_migrate_dst_conversion_host_name
By default, these variables are os_migrate_conv_src and os_migrate_conv_dst respectively.
Conversion host image name
The conversion host image is the guest configured to run the instance migrations:
os_migrate_src_conversion_image_name
os_migrate_dst_conversion_image_name
This image must be accessible to both projects before the conversion host deployment runs. The variables default to
os_migrate_conv. If a conversion host image is uploaded to Glance as a public image with this name in both clouds,
these variables do not need to be configured explicitly. Use a CentOS 9 cloud image or a RHEL 8 KVM guest image.
Conversion host flavor name
The conversion host flavor defines the compute, memory, and storage capacity allocated for the conversion hosts. It must include a volume of at least 20 GB:
os_migrate_src_conversion_flavor_name
os_migrate_dst_conversion_flavor_name
The m1.medium flavor usually meets this requirement, but the value can differ between deployments.
Conversion host external network name
The external network connects the conversion host router for external access. This external network must be able to allocate floating IPs reachable between both conversion hosts:
os_migrate_src_conversion_external_network_name
os_migrate_dst_conversion_external_network_name
This is not required when attaching the conversion host to a pre-existing network, that is, when
os_migrate_src_conversion_manage_network or os_migrate_dst_conversion_manage_network is false.
Other conversion host dependency names
The names of other conversion host dependency resources can be customized:
os_migrate_src_conversion_net_name
os_migrate_dst_conversion_net_name
os_migrate_src_conversion_subnet_name
os_migrate_dst_conversion_subnet_name
os_migrate_src_conversion_router_name
os_migrate_dst_conversion_router_name
os_migrate_src_conversion_secgroup_name
os_migrate_dst_conversion_secgroup_name
os_migrate_src_conversion_keypair_name
os_migrate_dst_conversion_keypair_name
Conversion host availability zone
Availability zones are defined by attaching metadata to an aggregate:
os_migrate_src_conversion_availability_zone
os_migrate_dst_conversion_availability_zone
The default is false, which means no availability zone is specified.
Conversion host network management
To disable creation and deletion of the conversion host private network, set the following variables to false:
os_migrate_src_conversion_manage_network
os_migrate_dst_conversion_manage_network
This disables creation of the network, the subnet, and the router that make the conversion host reachable from outside the cloud. When network management is disabled, provide a pre-existing network that the conversion host attaches to and uses to reach the other conversion host, by setting the network name variables:
os_migrate_src_conversion_net_name
os_migrate_dst_conversion_net_name
Conversion host floating IP management
To prevent OS Migrate from creating floating IPs on the conversion hosts, for example when attaching a conversion host to a public network where its address is already reachable, set the following variables:
os_migrate_src_conversion_manage_fip
os_migrate_dst_conversion_manage_fip
When the conversion hosts are removed, the assigned floating IPs are detached or removed. The following variables
control whether the floating IP is deleted when deleting the conversion hosts. The default is true:
os_migrate_src_conversion_host_delete_fip
os_migrate_dst_conversion_host_delete_fip
When the corresponding …_manage_fip variable is false, floating IP deletion is not attempted even if
…_delete_fip is true.
Conversion host specific floating IP
Each conversion host requires a floating IP. Floating IPs can be assigned automatically or defined by the operator:
os_migrate_src_conversion_floating_ip_address
os_migrate_dst_conversion_floating_ip_address
When specifying an exact address, the floating IP must already exist and be available for attaching.
Attaching conversion hosts to public networks
A combination of the preceding variables attaches the conversion hosts directly to pre-existing public networks. This requires disabling private network creation, disabling floating IP creation, and setting the network names:
os_migrate_src_conversion_manage_network: false
os_migrate_dst_conversion_manage_network: false
os_migrate_src_conversion_manage_fip: false
os_migrate_dst_conversion_manage_fip: false
os_migrate_src_conversion_net_name: some_public_net_src
os_migrate_dst_conversion_net_name: some_public_net_dst
Conversion host boot from volume
The conversion hosts can be created as boot-from-volume servers in either cloud:
os_migrate_src_conversion_host_boot_from_volume
os_migrate_dst_conversion_host_boot_from_volume
The default is false, which means boot from the Nova local disk. When creating boot-from-volume conversion hosts,
customize the boot volume size in GB. The size must be 20 or more, and the default is 20:
os_migrate_src_conversion_host_volume_size
os_migrate_dst_conversion_host_volume_size
Conversion host RHEL variables
When using RHEL as the conversion host, set the SSH user name:
os_migrate_conversion_host_ssh_user: cloud-userSet the RHEL registration variables. The registration variables of this role default to omit. The variables
os_migrate_conversion_rhsm_auto_attach and os_migrate_conversion_rhsm_activationkey are mutually exclusive, and both
default to omit.
The registration variables to set are typically:
os_migrate_conversion_rhsm_username
os_migrate_conversion_rhsm_password
In this case, set os_migrate_conversion_rhsm_auto_attach to True to fetch the content automatically once the node is
registered.
Alternatively:
os_migrate_conversion_rhsm_activationkey
os_migrate_conversion_rhsm_org_id
In this case, leave os_migrate_conversion_rhsm_auto_attach at its default value of omit.
The complete list of registration variables corresponds to the redhat_subscription Ansible module. In OS Migrate they are named as follows:
os_migrate_conversion_rhsm_activationkey
os_migrate_conversion_rhsm_auto_attach
os_migrate_conversion_rhsm_consumer_id
os_migrate_conversion_rhsm_consumer_name
os_migrate_conversion_rhsm_consumer_type
os_migrate_conversion_rhsm_environment
os_migrate_conversion_rhsm_force_register
os_migrate_conversion_rhsm_org_id
os_migrate_conversion_rhsm_password
os_migrate_conversion_rhsm_pool
os_migrate_conversion_rhsm_pool_ids
os_migrate_conversion_rhsm_release
os_migrate_conversion_rhsm_rhsm_baseurl
os_migrate_conversion_rhsm_rhsm_repo_ca_cert
os_migrate_conversion_rhsm_server_hostname
os_migrate_conversion_rhsm_server_insecure
os_migrate_conversion_rhsm_server_proxy_hostname
os_migrate_conversion_rhsm_server_proxy_password
os_migrate_conversion_rhsm_server_proxy_port
os_migrate_conversion_rhsm_server_proxy_user
os_migrate_conversion_rhsm_syspurpose
os_migrate_conversion_rhsm_username
To enable specific repositories on the conversion hosts, use a list of repositories to enable:
os_migrate_conversion_rhsm_repositoriesPassword-based SSH access to the conversion hosts
To configure password-based SSH access to the conversion hosts, which can help with debugging when the private key is no longer available, set the following variables:
os_migrate_conversion_host_ssh_user_enable_password_access
os_migrate_conversion_host_ssh_user_password
The variable os_migrate_conversion_host_ssh_user_enable_password_access defaults to false, and
os_migrate_conversion_host_ssh_user_password defaults to weak_password_disabled_by_default. The user enabled for
password-based access is the one defined in os_migrate_conversion_host_ssh_user.
Custom scripts on the conversion hosts
Custom bash scripts can run on the conversion hosts before and after their content is configured. The content of the conversion hosts is a set of required packages, and, when using RHEL, the subscription management configuration. The following variables run the custom scripts:
os_migrate_src_conversion_host_pre_content_hook
os_migrate_src_conversion_host_post_content_hook
os_migrate_dst_conversion_host_pre_content_hook
os_migrate_dst_conversion_host_post_content_hook
The Ansible shell module runs the scripts, so a value can be a one-line command or a multi-line script:
os_migrate_src_conversion_host_pre_content_hook: |
  ls -ltah
  echo "hello world"
  df -h
Or:
os_migrate_src_conversion_host_pre_content_hook: "echo 'this is a simple command'"Disabling the subscription management tasks
To disable the native subscription management tasks, set the following variable to false:
os_migrate_conversion_rhsm_manageThis skips the RHSM tasks when using RHEL on the conversion hosts. Disabling RHSM is useful when the operator has custom scripts to use instead of the standard Ansible module.
3.3.3. Migration parameters reference
Resource YAML files generated by OS Migrate during export are editable. The params section of a resource specifies
direct resource properties, that is, what the resource is. The _migration_params section controls how an individual
resource is migrated. This reference describes the most important workload migration parameters. For the Ansible
variables that set defaults, see Variables reference.
Workload migration parameters
boot_disk_copy-
Controls whether the boot disk of the destination server is copied or re-imaged.
-
false: The destination server boots from a Glance image with the same name as the source server. This is the default for servers that were booted from an image in the source cloud. -
true: The boot disk of the source server is copied into the destination as a volume, and the destination server is created as boot-from-volume. For servers that are already boot-from-volume in the source cloud, this is the default and the only possible path.
-
data_copy-
Controls the storage migration mode for workloads.
-
true(default): OS Migrate performs the data copy. -
false: The OS Migrate data copy is skipped. Use this mode to attach pre-created volumes in the destination cloud when creating the instance.
-
boot_volume_params-
Controls new boot disk creation parameters in the destination when the source instance has no boot disk but
boot_disk_copyistrue. Several parameters are pre-filled and default toNone. ANonevalue means the parameter is not specified when creating the boot volume. For thenameparameter, the default for workload migration is used (prefix plus instance name). When the source instance already has a boot volume, do not useboot_volume_paramsto edit the destination creation parameters. Instead, edit the serialized volume in thevolumessection of the workload’sparams. boot_volume-
Controls new boot disk creation parameters for workload migrations with the storage mode (
data_copy) set tofalse. Several parameters are pre-filled and default toNone. ANonevalue means the parameter is not specified when creating the boot volume. For thenameparameter, the default for workload migration is used (prefix plus instance name). When the source instance already has a boot volume, edit the serialized volume in thevolumessection of the workload’sparamsinstead. additional_volumes-
Any additional volumes to configure for workload migrations with the storage mode (
data_copy) set tofalse. floating_ip_mode-
Controls whether and how floating IPs are created for workloads.
-
skip: Do not create any floating IPs on the destination server. -
new: Create a new floating IP with an auto-assigned address. -
existing: Assume the floating IP address specified in the workload serialization is already assigned to the destination project but not attached, and attach it. If this is not possible, fail. -
auto(default): Attempt theexistingmethod first, and fall back to thenewmethod if it fails.
-
Floating IP notes
In the workloads.yml export, each serialized floating IP contains a fixed_ip_address property, so a floating IP is
created on the port with this address. When editing ports or fixed addresses of a workload, also edit the
fixed_ip_address properties of its floating IPs accordingly.
The address of a newly created floating IP is selected automatically by the cloud. It does not match the floating IP address of the source server. In most cases the floating IP ranges of the source and destination clouds do not overlap.
3.3.4. NBD source migration variables
This reference describes the variables that control the import_from_hypervisor role and NBD source migration. For the
procedure, see Migrating workloads directly from the source hypervisor. These variables can be set in your playbook or inventory.
os_migrate_nbdkit_port-
Base port for
qemu-nbd. The port increments for each disk. Defaults to10809. os_migrate_nbdkit_protocol-
Transfer protocol, either
tcporssh. Usesshfor encrypted transfers over untrusted networks. Defaults totcp. os_migrate_nbdkit_ssh_user-
SSH user, used only with the
sshprotocol. os_migrate_nbdkit_readonly-
Set to
trueto open the source disks in read-only mode, which prevents accidental writes. Keeping this enabled is recommended. os_migrate_nbdkit_nova_instances_dir-
Directory of the Nova instances on the hypervisor. Defaults to
/var/lib/nova/instances.
3.3.5. Usage notes
The following notes describe recommended practices for OpenStack to OpenStack migration.
-
Run against testing and staging clouds first, and verify that the results match expectations.
-
Use a different
os_migrate_data_dirfor each project you authenticate to. OS Migrate works in project (tenant) scope most of the time. The data directory is populated with the exported resources of the source project and must not be mixed with the resources of another project. When you changeos_migrate_src_authoros_migrate_src_region_name, also changeos_migrate_data_dir. -
Use the same version of OS Migrate for export and import. Data files are not guaranteed to be compatible across versions. See Upgrading OS Migrate.
-
OS Migrate might not fit every use case out of the box. You can craft custom playbooks using the OS Migrate roles and modules as building blocks. See Migrator host requirements.
-
OS Migrate supports migrations for OpenStack versions 13 to 16 and 16 to 18, and simple upgrades from 15 to 16 or 16 to 17. Migrations between 13 to 16 and 16 to 18 are tested using RHEL 8.
3.3.6. Troubleshooting
This reference describes general troubleshooting tips and common issues for OpenStack to OpenStack migration.
General tips
-
Run
ansible-playbookwith the-vparameter for more detailed output.
Common issues
- Data version mismatch
-
DataVersionMismatch: OS Migrate runtime is version 'X.Y.Z', but tried to parse data file 'abc.yml' with
os_migrate_version field set to 'A.B.C'.
OS Migrate export playbooks do not truncate existing data files. OS Migrate adds each resource serialization to the existing YAML file, or updates a serialization if one with the same ID is already present. OS Migrate refuses to parse YAML files created with a different version. In many cases such parsing would work, but not always, so OS Migrate requires clearing the data directory when upgrading to a new version and re-running the export playbooks. An advanced user who verifies that the previous and new versions include no change in export data structures can edit the
os_migrate_versionfield in the data files. Use this option with caution. See Upgrading OS Migrate. - Censored string issue
-
AnsibleCensoringStringIssue: workloads.yml setup task altering log_file path during preliminary import workload
steps.
OS Migrate uses OpenStack modules to build their argument spec through a function in OpenStack module utilities. When project names are marked
no_log, values are censored in the response. For example, in the import workloads setup task,/home/project_name/workloads/import_workloads.ymlbecomes/home//workloads/import_workloads.yml. OS Migrate cannot mark only the password in the credentials dictionary as a secret. Instead, the whole credentials dictionary is marked as a secret. As a workaround, sanitize the project name in a pre-migration playbook that sets up the storage directories for the OS Migrate variables or data. - Keypair migration pitfalls
-
KeypairMigrationPitfalls: Keys are not seen by the user performing migrations.When a user creates keypairs and assigns them to a resource, the user performing the migration can access the resource but not the required keys, so checks fail because the user cannot confirm that the key exists in the source cloud. OS Migrate provides
export_user_keypairs.yml, which escalates using admin privileges. By default it iterates over all users and their keys, and it accepts filter variables to scope the export. How to use these key exports depends on how the workload migration is performed. The keys can be uploaded to the destination for the respective users throughimport_users_keypairs.yml, and the destination credentials for workload migration must belong to the users who can see the keys. Alternatively, edit theuser_ref.nameanduser_ref.domain_namevalues in the exported YAML from actual names to%auth%values, and use that data file withimport_keypairs.ymlrun as a tenant user rather than admin. This imports all the keys under a single user, and that user can then perform the migration with all the necessary public keys.
NBD source migration
For NBD source migration concepts and procedure, see NBD source migration and Migrating workloads directly from the source hypervisor.
- qemu-nbd process not starting
-
Check whether the port is already in use:
sudo netstat -tlnp | grep 10809The
import_from_hypervisorrole automatically stops existingqemu-nbdprocesses on the same port before starting new ones. - Cannot connect to NBD from the destination
-
Test connectivity from the destination conversion host:
qemu-img info nbd://hypervisor-hostname:10809Check the firewall rules on the hypervisor and verify that
qemu-nbdis listening:sudo netstat -tlnp | grep qemu-nbd - Instance not in SHUTOFF state
-
The
import_from_hypervisorrole requires instances to beSHUTOFFbefore spawningqemu-nbd. Either shut down the instance manually, or setos_migrate_workload_stop_before_migration: true. - Missing hypervisor_hostname
-
The
hypervisor_hostnamefield is populated byexport_workloads. Make sure you have run the export step and that the source cloud API provides this information.
3.4. Documented modules in os-migrate
3.4.2. Module - auth_info
This module provides for the following ansible plugin:
-
auth_info
:module: os_migrate/plugins/modules/auth_info.py
:documentation: true
:examples: true
3.4.3. Module - os_conversion_host_info
This module provides for the following ansible plugin:
-
os_conversion_host_info
:module: os_migrate/plugins/modules/os_conversion_host_info.py
:documentation: true
:examples: true
3.4.4. Module - os_keypairs_info
This module provides for the following ansible plugin:
-
os_keypairs_info
:module: os_migrate/plugins/modules/os_keypairs_info.py
:documentation: true
:examples: true
3.4.5. Module - os_role_assignments_info
This module provides for the following ansible plugin:
-
os_role_assignments_info
:module: os_migrate/plugins/modules/os_role_assignments_info.py
:documentation: true
:examples: true
3.4.6. Module - os_routers_info
This module provides for the following ansible plugin:
-
os_routers_info
:module: os_migrate/plugins/modules/os_routers_info.py
:documentation: true
:examples: true
3.4.7. Module - os_security_groups_info
This module provides for the following ansible plugin:
-
os_security_groups_info
:module: os_migrate/plugins/modules/os_security_groups_info.py
:documentation: true
:examples: true
3.4.8. Export Modules
Module - export_project
This module provides for the following ansible plugin:
-
export_project
:module: os_migrate/plugins/modules/export_project.py
:documentation: true
:examples: true
Module - export_user
This module provides for the following ansible plugin:
-
export_user
:module: os_migrate/plugins/modules/export_user.py
:documentation: true
:examples: true
Module - export_user_project_role_assignment
This module provides for the following ansible plugin:
-
export_user_project_role_assignment
:module: os_migrate/plugins/modules/export_user_project_role_assignment.py
:documentation: true
:examples: true
Module - export_keypair
This module provides for the following ansible plugin:
-
export_keypair
:module: os_migrate/plugins/modules/export_keypair.py
:documentation: true
:examples: true
Module - export_flavor
This module provides for the following ansible plugin:
-
export_flavor
:module: os_migrate/plugins/modules/export_flavor.py
:documentation: true
:examples: true
Module - export_workload
This module provides for the following ansible plugin:
-
export_workload
:module: os_migrate/plugins/modules/export_workload.py
:documentation: true
:examples: true
Module - export_detached_volume
This module provides for the following ansible plugin:
-
export_detached_volume
:module: os_migrate/plugins/modules/export_detached_volume.py
:documentation: true
:examples: true
Module - export_image_blob
This module provides for the following ansible plugin:
-
export_image_blob
:module: os_migrate/plugins/modules/export_image_blob.py
:documentation: true
:examples: true
Module - export_image_meta
This module provides for the following ansible plugin:
-
export_image_meta
:module: os_migrate/plugins/modules/export_image_meta.py
:documentation: true
:examples: true
Module - export_network
This module provides for the following ansible plugin:
-
export_network
:module: os_migrate/plugins/modules/export_network.py
:documentation: true
:examples: true
Module - export_subnet
This module provides for the following ansible plugin:
-
export_subnet
:module: os_migrate/plugins/modules/export_subnet.py
:documentation: true
:examples: true
Module - export_router
This module provides for the following ansible plugin:
-
export_router
:module: os_migrate/plugins/modules/export_router.py
:documentation: true
:examples: true
Module - export_router_interfaces
This module provides for the following ansible plugin:
-
export_router_interfaces
:module: os_migrate/plugins/modules/export_router_interfaces.py
:documentation: true
:examples: true
Module - export_security_group
This module provides for the following ansible plugin:
-
export_security_group
:module: os_migrate/plugins/modules/export_security_group.py
:documentation: true
:examples: true
Module - export_security_group_rules
This module provides for the following ansible plugin:
-
export_security_group_rules
:module: os_migrate/plugins/modules/export_security_group_rules.py
:documentation: true
:examples: true
3.4.9. Import Modules
Module - import_project
This module provides for the following ansible plugin:
-
import_project
:module: os_migrate/plugins/modules/import_project.py
:documentation: true
:examples: true
Module - import_user
This module provides for the following ansible plugin:
-
import_user
:module: os_migrate/plugins/modules/import_user.py
:documentation: true
:examples: true
Module - import_user_project_role_assignment
This module provides for the following ansible plugin:
-
import_user_project_role_assignment
:module: os_migrate/plugins/modules/import_user_project_role_assignment.py
:documentation: true
:examples: true
Module - import_keypair
This module provides for the following ansible plugin:
-
import_keypair
:module: os_migrate/plugins/modules/import_keypair.py
:documentation: true
:examples: true
Module - import_flavor
This module provides for the following ansible plugin:
-
import_flavor
:module: os_migrate/plugins/modules/import_flavor.py
:documentation: true
:examples: true
Module - import_image
This module provides for the following ansible plugin:
-
import_image
:module: os_migrate/plugins/modules/import_image.py
:documentation: true
:examples: true
Module - import_network
This module provides for the following ansible plugin:
-
import_network
:module: os_migrate/plugins/modules/import_network.py
:documentation: true
:examples: true
Module - import_subnet
This module provides for the following ansible plugin:
-
import_subnet
:module: os_migrate/plugins/modules/import_subnet.py
:documentation: true
:examples: true
Module - import_router
This module provides for the following ansible plugin:
-
import_router
:module: os_migrate/plugins/modules/import_router.py
:documentation: true
:examples: true
Module - import_router_interface
This module provides for the following ansible plugin:
-
import_router_interface
:module: os_migrate/plugins/modules/import_router_interface.py
:documentation: true
:examples: true
Module - import_security_group
This module provides for the following ansible plugin:
-
import_security_group
:module: os_migrate/plugins/modules/import_security_group.py
:documentation: true
:examples: true
Module - import_security_group_rule
This module provides for the following ansible plugin:
-
import_security_group_rule
:module: os_migrate/plugins/modules/import_security_group_rule.py
:documentation: true
:examples: true
Module - import_volumes_export
This module provides for the following ansible plugin:
-
import_volumes_export
:module: os_migrate/plugins/modules/import_volumes_export.py
:documentation: true
:examples: true
Module - import_volumes_src_cleanup
This module provides for the following ansible plugin:
-
import_volumes_src_cleanup
:module: os_migrate/plugins/modules/import_volumes_src_cleanup.py
:documentation: true
:examples: true
Module - import_volumes_transfer
This module provides for the following ansible plugin:
-
import_volumes_transfer
:module: os_migrate/plugins/modules/import_volumes_transfer.py
:documentation: true
:examples: true
Module - import_workload_create_instance
This module provides for the following ansible plugin:
-
import_workload_create_instance
:module: os_migrate/plugins/modules/import_workload_create_instance.py
:documentation: true
:examples: true
Module - import_workload_dst_check
This module provides for the following ansible plugin:
-
import_workload_dst_check
:module: os_migrate/plugins/modules/import_workload_dst_check.py
:documentation: true
:examples: true
Module - import_workload_dst_failure_cleanup
This module provides for the following ansible plugin:
-
import_workload_dst_failure_cleanup
:module: os_migrate/plugins/modules/import_workload_dst_failure_cleanup.py
:documentation: true
:examples: true
Module - import_workload_export_volumes
This module provides for the following ansible plugin:
-
import_workload_export_volumes
:module: os_migrate/plugins/modules/import_workload_export_volumes.py
:documentation: true
:examples: true
Module - import_workload_prelim
This module provides for the following ansible plugin:
-
import_workload_prelim
:module: os_migrate/plugins/modules/import_workload_prelim.py
:documentation: true
:examples: true
Module - import_workload_src_check
This module provides for the following ansible plugin:
-
import_workload_src_check
:module: os_migrate/plugins/modules/import_workload_src_check.py
:documentation: true
:examples: true
Module - import_workload_src_cleanup
This module provides for the following ansible plugin:
-
import_workload_src_cleanup
:module: os_migrate/plugins/modules/import_workload_src_cleanup.py
:documentation: true
:examples: true
Module - import_workload_transfer_volumes
This module provides for the following ansible plugin:
-
import_workload_transfer_volumes
:module: os_migrate/plugins/modules/import_workload_transfer_volumes.py
:documentation: true
:examples: true
3.4.11. Module - read_resources
This module provides for the following ansible plugin:
-
read_resources
:module: os_migrate/plugins/modules/read_resources.py
:documentation: true
:examples: true
3.4.12. Module - validate_resource_files
This module provides for the following ansible plugin:
-
validate_resource_files
:module: os_migrate/plugins/modules/validate_resource_files.py
:documentation: true
:examples: true
3.5. Documented roles in os-migrate
3.5.2. Role - conversion_host
-
ansibleautoplugin:: :role: os_migrate/roles/conversion_host
3.5.3. Role - conversion_host_content
-
ansibleautoplugin:: :role: os_migrate/roles/conversion_host_content
3.5.5. Role - prelude_common
-
ansibleautoplugin:: :role: os_migrate/roles/prelude_common
3.5.6. Role - prelude_dst
-
ansibleautoplugin:: :role: os_migrate/roles/prelude_dst
3.5.7. Role - prelude_src
-
ansibleautoplugin:: :role: os_migrate/roles/prelude_src
3.5.8. Role - validate_data_dir
-
ansibleautoplugin:: :role: os_migrate/roles/validate_data_dir
3.5.9. Role - validate_resource_files
-
ansibleautoplugin:: :role: os_migrate/roles/validate_resource_files
3.5.10. Export Roles
Role - export_projects
-
ansibleautoplugin:: :role: os_migrate/roles/export_projects
Role - export_users
-
ansibleautoplugin:: :role: os_migrate/roles/export_users
Role - export_user_project_role_assignments
-
ansibleautoplugin:: :role: os_migrate/roles/export_user_project_role_assignments
Role - export_keypairs
-
ansibleautoplugin:: :role: os_migrate/roles/export_keypairs
Role - export_users_keypairs
This role is meant to be run with admin privileges. It imports Nova
keypairs matching os_migrate_keypairs_filter for all users
matching os_migrate_users_filter.
When using this role, make sure you have recent enough OpenStack SDK (0.57+).
-
ansibleautoplugin:: :role: os_migrate/roles/export_users_keypairs
Role - export_flavors
-
ansibleautoplugin:: :role: os_migrate/roles/export_flavors
Role - export_workloads
-
ansibleautoplugin:: :role: os_migrate/roles/export_workloads
Role - export_detached_volumes
-
ansibleautoplugin:: :role: os_migrate/roles/export_detached_volumes
Role - export_images
-
ansibleautoplugin:: :role: os_migrate/roles/export_images
Role - export_networks
-
ansibleautoplugin:: :role: os_migrate/roles/export_networks
Role - export_subnets
-
ansibleautoplugin:: :role: os_migrate/roles/export_subnets
Role - export_routers
-
ansibleautoplugin:: :role: os_migrate/roles/export_routers
Role - export_router_interfaces
-
ansibleautoplugin:: :role: os_migrate/roles/export_router_interfaces
Role - export_security_groups
-
ansibleautoplugin:: :role: os_migrate/roles/export_security_groups
Role - export_security_group_rules
-
ansibleautoplugin:: :role: os_migrate/roles/export_security_group_rules
3.5.11. Import Roles
Role - import_projects
-
ansibleautoplugin:: :role: os_migrate/roles/import_projects
Role - import_users
-
ansibleautoplugin:: :role: os_migrate/roles/import_users
Role - import_user_project_role_assignments
-
ansibleautoplugin:: :role: os_migrate/roles/import_user_project_role_assignments
Role - import_keypairs
-
ansibleautoplugin:: :role: os_migrate/roles/import_keypairs
Role - import_users_keypairs
This role is meant to be run with admin privileges. It exports Nova
keypairs matching os_migrate_keypairs_filter for all users
matching os_migrate_users_filter.
When using this role, make sure you have recent enough OpenStack SDK (0.57+).
-
ansibleautoplugin:: :role: os_migrate/roles/import_users_keypairs
Role - import_flavors
-
ansibleautoplugin:: :role: os_migrate/roles/import_flavors
Role - import_workloads
-
ansibleautoplugin:: :role: os_migrate/roles/import_workloads
Role - import_detached_volumes
-
ansibleautoplugin:: :role: os_migrate/roles/import_detached_volumes
Role - import_images
-
ansibleautoplugin:: :role: os_migrate/roles/import_images
Role - import_networks
-
ansibleautoplugin:: :role: os_migrate/roles/import_networks
Role - import_subnets
-
ansibleautoplugin:: :role: os_migrate/roles/import_subnets
Role - import_routers
-
ansibleautoplugin:: :role: os_migrate/roles/import_routers
Role - import_router_interfaces
-
ansibleautoplugin:: :role: os_migrate/roles/import_router_interfaces
Role - import_security_groups
-
ansibleautoplugin:: :role: os_migrate/roles/import_security_groups
Role - import_security_group_rules
-
ansibleautoplugin:: :role: os_migrate/roles/import_security_group_rules
4. Common reference
This part collects material shared by the VMware to OpenStack and OpenStack to OpenStack guides: the migrator host and conversion host concepts, collection installation, and the glossary.
4.1. Migrator host requirements
The migrator host is the machine that runs the OS Migrate Ansible playbooks. It is the orchestration point for a migration and connects to the source environment, the destination OpenStack cloud, and any conversion hosts.
The migrator host can be one of the following:
-
An instance in the source cloud.
-
A separate physical or virtual machine.
-
An Ansible Execution Environment container.
4.1.1. System requirements
- Operating system
-
A Linux distribution able to run Ansible. CentOS Stream or RHEL are common choices. Workload migrations that use
virt-v2vrequire thevirtio-winpackage version 1.40 or later. - Python and Ansible
-
Python 3.7 or later and Ansible 2.9 or later. The provided container image uses Python 3.12.
- Python packages
-
ansible ansible-lint passlib PyYAML - Ansible collections
-
vmware.vmware: ">=2.4.0"
vmware.vmware_rest: ">=5.0.0"
4.1.2. Storage requirements
-
Enough disk space in the data directory (
os_migrate_data_dir, default/home/migrator/os-migrate-data). -
A separate data directory for each source project migration.
-
Additional space for volume conversion during workload migrations.
4.1.3. Network access
-
Outbound HTTPS access to both the source and destination OpenStack APIs.
-
Inbound SSH access if the host is also used as a remote conversion host.
-
Bandwidth sufficient for volume and image data transfer.
4.1.4. Inventory configuration
Define the migrator host as a local connection in the Ansible inventory:
migrator:
  hosts:
    localhost:
      ansible_connection: local
      ansible_python_interpreter: "{{ ansible_playbook_python }}"
4.1.5. Required variables
os_migrate_src_auth-
Source cloud authentication.
os_migrate_dst_auth-
Destination cloud authentication.
os_migrate_data_dir-
Migration data storage location.
Set region and API version values as required by your clouds.
4.1.6. Security
-
OS Migrate uses the OpenStack API only. It does not use direct database access.
-
Store credentials securely, for example in an encrypted variables file.
-
Restrict network access between the migrator host and the clouds to what the migration requires.
4.2. Conversion hosts
A conversion host is a compute instance that performs the data transfer for a workload migration. It attaches the volumes that hold the migrated disks, receives the disk data over the network, and prepares the volumes so that the destination cloud can boot the migrated instance.
The role of the conversion host depends on the type of migration:
- VMware to OpenStack
-
A single conversion host runs in the destination OpenStack cloud. It connects to the VMware source through the
nbdkitserver orvirt-v2vand writes the converted disks to Cinder volumes. - OpenStack to OpenStack
-
Two conversion hosts are used, one in the source cloud and one in the destination cloud. Volume data is transferred between them over an NBD connection tunneled through SSH.
4.2.1. Conversion host content
Conversion host content is the set of packages and configuration deployed on a conversion host to enable migration.
The conversion_host and conversion_host_content roles create the instance and install this content.
4.2.2. Conversion host variables
Conversion host behavior is controlled by the os_migrate_*conversion* variables, for example the instance name,
flavor, network, subnet CIDR, and whether the host boots from a volume. For the full list, see the variable reference
in the guide you are following.
4.3. Installing the OS Migrate collections
OS Migrate provides two Ansible collections:
-
os_migrate.os_migratefor OpenStack to OpenStack migration. -
os_migrate.vmware_migration_kitfor VMware to OpenStack migration.
Install the collection that matches the migration you perform. Installation from Ansible Galaxy is the recommended method. Installation from source is available when you customize the collection.
-
Ansible 2.9 or later, running on Python 3.
-
Package dependencies for the OpenStack modules:
iputils,python3-openstackclient,python3-openstacksdk.
-
(Optional) If your distribution does not ship the required dependency versions, use a virtual environment:
python3 -m venv $HOME/os_migrate_venv source $HOME/os_migrate_venv/bin/activate python3 -m pip install --upgrade 'openstacksdk' python3 -m pip install --upgrade 'ansible-core' -
Install a collection from Ansible Galaxy:
ansible-galaxy collection install os_migrate.os_migrateTo install the VMware Migration Kit:
ansible-galaxy collection install os_migrate.vmware_migration_kitTo install a specific release, append the version:
ansible-galaxy collection install os_migrate.os_migrate:<VERSION> -
(Optional) Install
os_migrate.os_migratefrom source when you customize it:git clone https://github.com/os-migrate/os-migrate cd os-migrate make toolbox-build ./toolbox/run make pushd releases ansible-galaxy collection install --force os_migrate-os_migrate-latest.tar.gz popd
Available releases are listed on the OS Migrate Galaxy page.
4.4. OS Migrate glossary
This glossary defines terms used across the OS Migrate documentation.
4.4.1. Core concepts
- OS Migrate collection
-
The Ansible collection
os_migrate.os_migratethat provides modules, roles, and playbooks for migrating OpenStack resources between clouds. - VMware Migration Kit
-
The Ansible collection
os_migrate.vmware_migration_kitthat migrates virtual machines from VMware to OpenStack. - Resource
-
An OpenStack entity that can be migrated, such as a network, instance, flavor, or image. Each resource type has its own export and import workflow.
- Export phase
-
The process of extracting resource definitions from a source OpenStack cloud and serializing them to YAML files.
- Import phase
-
The process of reading YAML resource files and creating the corresponding resources in a destination OpenStack cloud.
- Parallel migration
-
A strategy where a second OpenStack deployment runs alongside an existing one, with tenant resources migrated between them.
- Idempotent operations
-
Playbooks that can be re-run safely without duplicating resources or causing conflicts.
4.4.2. Resource types
- Workloads
-
Running instances that are migrated with their attached storage and network configuration.
- Detached volumes
-
Storage volumes not attached to any instance.
- Flavors
-
Templates that define instance CPU, memory, and disk specifications.
- Images
-
Disk images used as templates for creating instances.
- Networks
-
Virtual networks that provide connectivity between instances.
- Subnets
-
IP address ranges within networks.
- Routers
-
Virtual routers that connect networks and external networks.
- Router interfaces
-
Connections between routers and subnets.
- Security groups
-
Sets of firewall rules that control traffic to instances.
- Security group rules
-
Individual firewall rules within a security group.
- Projects
-
OpenStack tenants that contain and isolate resources.
- Users
-
OpenStack user accounts with authentication credentials.
- Keypairs
-
SSH key pairs used for instance access.
- User project role assignments
-
Mappings that grant users roles within projects.
4.4.3. Migration infrastructure
- Conversion host
-
An instance that performs the disk data transfer during a workload migration. See Conversion hosts.
- Conversion host content
-
Software and configuration deployed on a conversion host to enable migration.
- Migrator host
-
The system where OS Migrate playbooks run. See Migrator host requirements.
4.4.4. Data management
- Data directory (
os_migrate_data_dir) -
Local filesystem location where exported YAML resource files are stored.
- Resource filter (
os_migrate_<resource>_filter) -
Name-based filtering that selects specific resources to export or import instead of all resources of a type.
- Serialization
-
Conversion of OpenStack SDK objects into the OS Migrate YAML format.
- Migration parameters
-
OS Migrate settings that control migration behavior for a resource. See the migration parameters reference in the OpenStack to OpenStack guide.
4.4.5. Authentication
- Source auth (
os_migrate_src_auth) -
OpenStack authentication for the source cloud.
- Destination auth (
os_migrate_dst_auth) -
OpenStack authentication for the destination cloud.
- clouds.yaml
-
OpenStack client configuration file that holds cloud authentication details.
4.4.6. Ansible components
- Export roles
-
Roles that call export modules and handle resource filtering, for example
export_networks. - Import roles
-
Roles that validate data files and call import modules, for example
import_networks. - Export modules
-
Modules that retrieve resources and serialize them to YAML, for example
export_flavor. - Import modules
-
Modules that read YAML files and create resources, for example
import_flavor. - Prelude roles
-
Setup roles that prepare the environment:
prelude_src,prelude_dst, andprelude_common.
5. Community
For issue reports, use the GitHub issue trackers of the VMware Migration Kit and OS Migrate repositories.