OS Migrate Walkthrough
OS Migrate is a framework for OpenStack parallel cloud migration (migrating content between OpenStack tenants which are not necessarily in the same cloud). It’s a collection of Ansible playbooks that provide the basic functionality, but may not fit each use case out of the box. You can craft custom playbooks using the OS Migrate collection pieces (roles and modules) as building blocks.
Parallel cloud migration is a way to modernize an OpenStack deployment. Instead of upgrading an OpenStack cluster in place, a second OpenStack cluster is deployed alongside, and tenant content is migrated from the original cluster to the new one. Parallel cloud migration is best suited for environments which are due for a hardware refresh cycle. It may also be performed without a hardware refresh, but extra hardware resources are needed to bootstrap the new cluster. As hardware resources free up in the original cluster, they can be gradually added to the new cluster.
OS Migrate strictly uses the official OpenStack API and does not utilize direct database access or other methods to export or import data. The Ansible playbooks contained in OS Migrate are idempotent. If a command fails, you can retry with the same command.
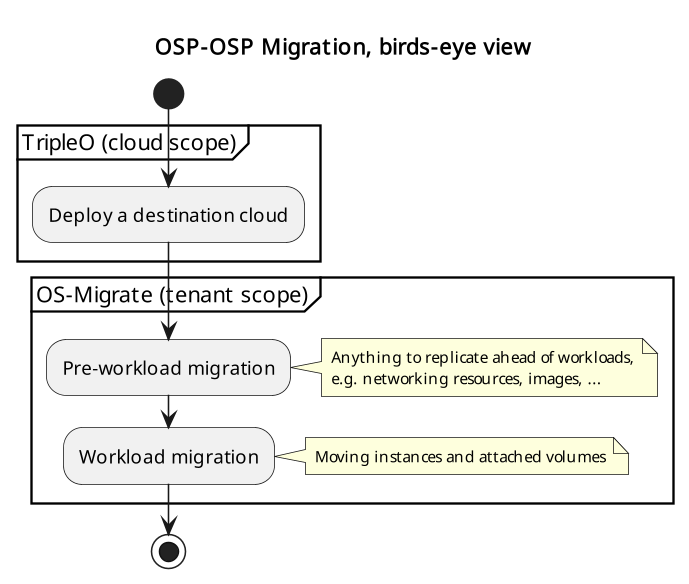
OSP-OSP Migration Overview
The migration is generally performed in this sequence:
prerequisites: prepare authentication info, parameter files,
pre-workload migration, which copies applicable resources into the destination cloud (e.g. networks, security groups, images) while workloads keep running in the source cloud,
workload migration, which stops usage of applicable resources in the source cloud and moves them into the destination cloud (VMs, volumes).
Prerequisites
Authentication
Users are encouraged to use os-migrate using specific credentials for each project/tenant, this means not using the admin user to execute the resources migration (unless the resource is owned by the admin project, e.g. public Glance images).
In case the circumstances require migrating by the admin user,
this user needs to have access to the respective projects. There are
two options:
Add the
adminuser as a_member_of each project.Depending on how many projects need to be migrated this approach seems to be suboptimal as there are involved several configuration updates in the projects that will need to be reverted after the migration completes.
Create a group including the admin user and add the group to each project as member.
The difference with this approach is that once the migration is completed, by removing the group, all the references in all the projects will be removed automatically.
Parameter file
Let’s create an os-migrate-vars.yml file with Ansible variables:
os_migrate_src_auth:
  auth_url: http://192.168.0.13.199/v3
  password: srcpassword
  project_domain_name: Default
  project_name: src
  user_domain_name: Default
  username: src
os_migrate_src_region_name: regionOne
os_migrate_dst_auth:
  auth_url: http://192.167.0.16:5000/v3
  password: dstpassword
  project_domain_name: Default
  project_name: dst
  user_domain_name: Default
  username: dst
os_migrate_dst_region_name: regionOne

os_migrate_data_dir: /home/migrator/os-migrate-data
The file contains the source and destination tenant credentials, a directory on the migrator host (typically localhost) and a directory where the exported data will be saved.
If you are migrating content from multiple source projects, make
sure to use a separate data directory for each source project. In
other words, when changing os_migrate_src_auth or
os_migrate_src_region_name, make sure to also change
os_migrate_data_dir.
A note about Keystone v2
As depicted in content of the previously defined os-migrate-vars.yml
file, the parameters os_migrate_src_auth and os_migrate_dst_auth
refer to the usage of Keystone v3. In the case of a user needing to
execute a migration between tenants not supporting Keystone v3 the
following error will be raised:
keystoneauth1.exceptions.discovery.DiscoveryFailure: Cannot use v2 authentication with domain scope
To fix this issue, the user must adjust their auth parameters:
os_migrate_src_auth:
  auth_url: http://192.168.0.13.199/v2.0
  password: srcpassword
  project_name: src
  username: src
os_migrate_src_region_name: regionOne
Notice that the parameters project_domain_name and
user_domain_name are removed and the auth_url parameter points
to the Keystone v2 endpoint.
Shortcuts
We will use the OS Migrate collection path and an ansible-playbook command with the following arguments routinely, so let’s save them as variables in the shell:
export OSM_DIR=/home/migrator/.ansible/collections/ansible_collections/os_migrate/os_migrate
export OSM_CMD="ansible-playbook -v -i $OSM_DIR/localhost_inventory.yml -e @os-migrate-vars.yml"
Pre-workload migration
Workloads require the support of several resources in a given cloud to operate properly. Some of these resources include networks, subnets, routers, router interfaces, security groups, and security group rules. The pre-workload migration process includes exporting these resources from the source cloud onto the migrator machine, the option to edit the resources if desired, and importing them into the destination cloud.
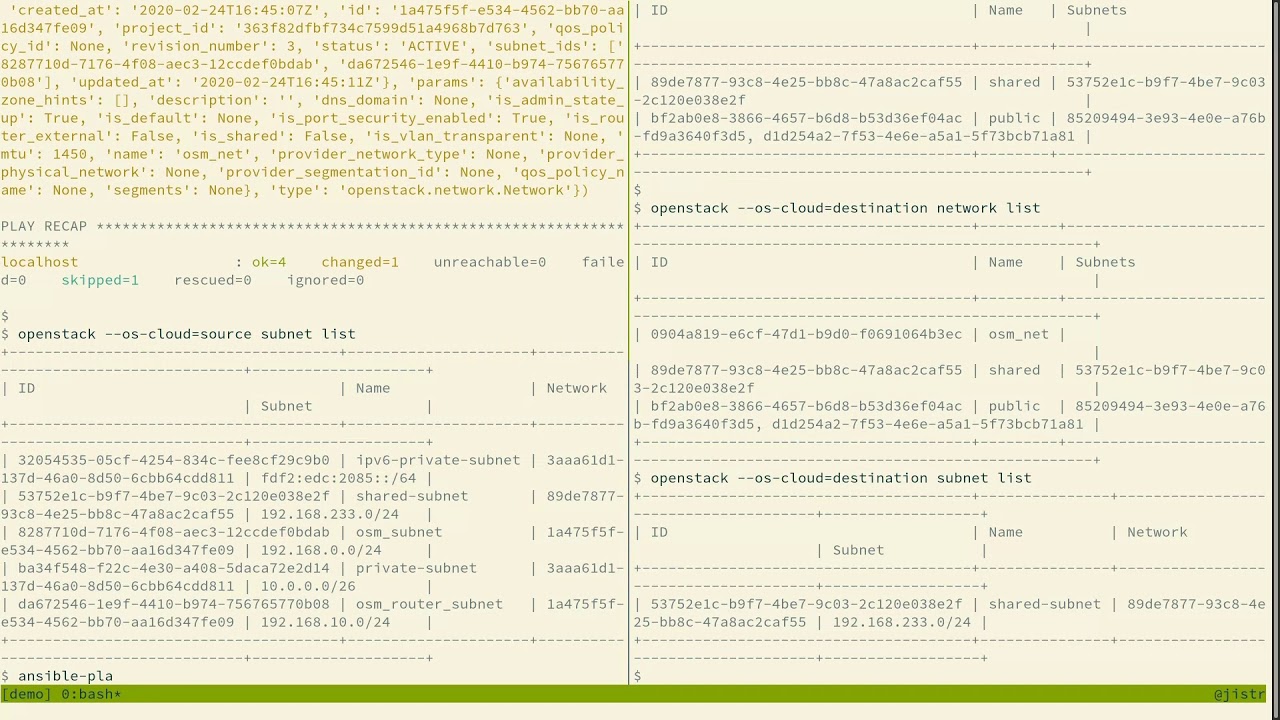
Exporting or importing resources is enabled by running the corresponding playbook from OS Migrate. Let’s look at a concrete example. To export the networks, run the “export_networks” playbook.
Export and import
To export the networks:
$OSM_CMD $OSM_DIR/playbooks/export_networks.yml
This will create networks.yml file in the data directory, similar to this:
os_migrate_version: 0.17.0
resources:
  - _info:
      availability_zones:
        - nova
      created_at: '2020-04-07T14:08:30Z'
      id: a1eb31f6-2cdc-4896-b582-8950dafa34aa
      project_id: 2f444c71265048f7a9d21f81db6f21a4
      qos_policy_id: null
      revision_number: 3
      status: ACTIVE
      subnet_ids:
        - a5052e10-5e00-432b-a826-29695677aca0
        - d450ffd0-972e-4398-ab49-6ba9e29e2499
      updated_at: '2020-04-07T14:08:34Z'
    params:
      availability_zone_hints: []
      description: ''
      dns_domain: null
      is_admin_state_up: true
      is_default: null
      is_port_security_enabled: true
      is_router_external: false
      is_shared: false
      is_vlan_transparent: null
      mtu: 1450
      name: osm_net
      provider_network_type: null
      provider_physical_network: null
      provider_segmentation_id: null
      qos_policy_name: null
      segments: null
    type: openstack.network.Network
You may edit the file as needed and then run the “import_networks” playbook to import the networks from this file into the destination cloud:
$OSM_CMD $OSM_DIR/playbooks/import_networks.yml
You can repeat this process for other resources like subnets, security groups, security group rules, routers, router interfaces, images and keypairs.
For a full list of available playbooks, run:
ls $OSM_DIR/playbooks
Diagrams
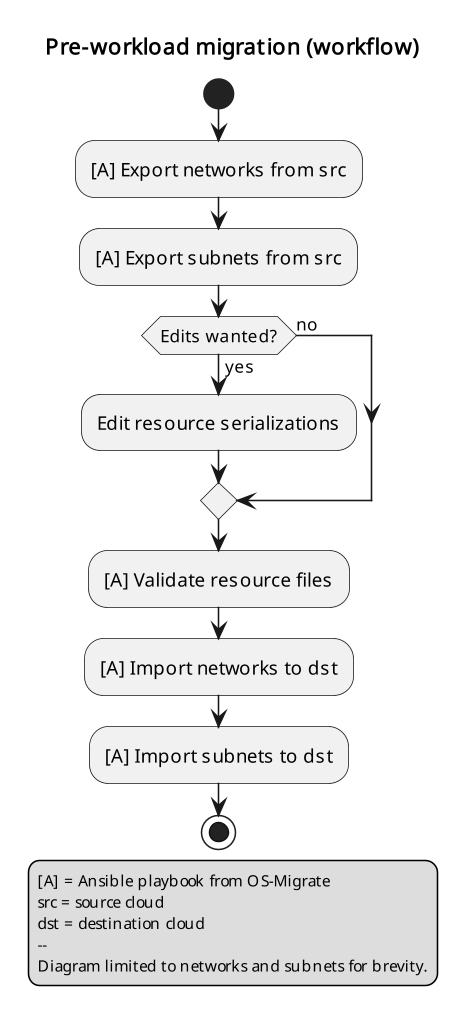
Pre-workload Migration (workflow)
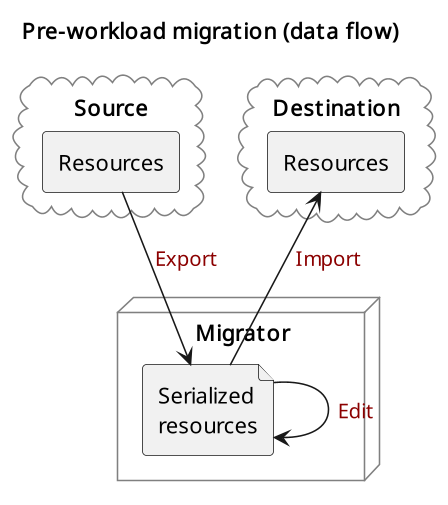
Pre-workload Migration (data flow)
Demo
Pre-workload migration recorded demo:
Detached volume migration
It is possible to migrate detached volumes in the same way as we do with other openstack resource types. The migration process includes exporting these volumes from the source cloud onto the migrator machine, attaching the volume to the conversion host in source cloud, creating the volume in the destination cloud and transferring the content of the volumes. It is possible to choose the volumes to migrate using the reource filter
os_migrate_detached_volumes_filter:
- detached_volume1
- detached_volume2
- regex: ^myprefix_.**
The above example says: Export only volumes named detached_volume1 or
detached_volume2 or starting with myprefix_.
To export the volumes it is needed to execute the playbook:
$OSM_CMD $OSM_DIR/playbooks/export_detached_volumes.yml
This will create detached_volumes.yml file in the data directory, similar to this:
os_migrate_version: 1.0.5
resources:
- _info:
    attachments: []
    id: 0e9ff1ab-fb8d-4c12-81c4-29d519d09cb9
    is_bootable: false
    size: 5
  _migration_params: {}
  params:
    availability_zone: nova
    description: null
    name: test-detached-volume
    volume_type: tripleo
  type: openstack.network.ServerVolume
You may edit the file as needed and then run the “import_detached_volumes” playbook to import the volumes from this file into the destination cloud:
$OSM_CMD $OSM_DIR/playbooks/import_detached_volumes.yml
Diagram
Detached volume Migration (data flow)
Workload migration
Workload information is exported in a similar method to networks, security groups, etc. as in the previous sections. Run the “export_workloads” playbook, and edit the resulting workloads.yml as desired:
os_migrate_version: 0.17.0
resources:
- _info:
    addresses:
      external_network:
      - OS-EXT-IPS-MAC:mac_addr: fa:16:3e:98:19:a0
        OS-EXT-IPS:type: fixed
        addr: 10.19.2.41
        version: 4
    flavor_id: a96b2815-3525-4eea-9ab4-14ba58e17835
    id: 0025f062-f684-4e02-9da2-3219e011ec74
    status: SHUTOFF
  params:
    flavor_name: m1.small
    name: migration-vm
    security_group_names:
    - testing123
    - default
  type: openstack.compute.Server
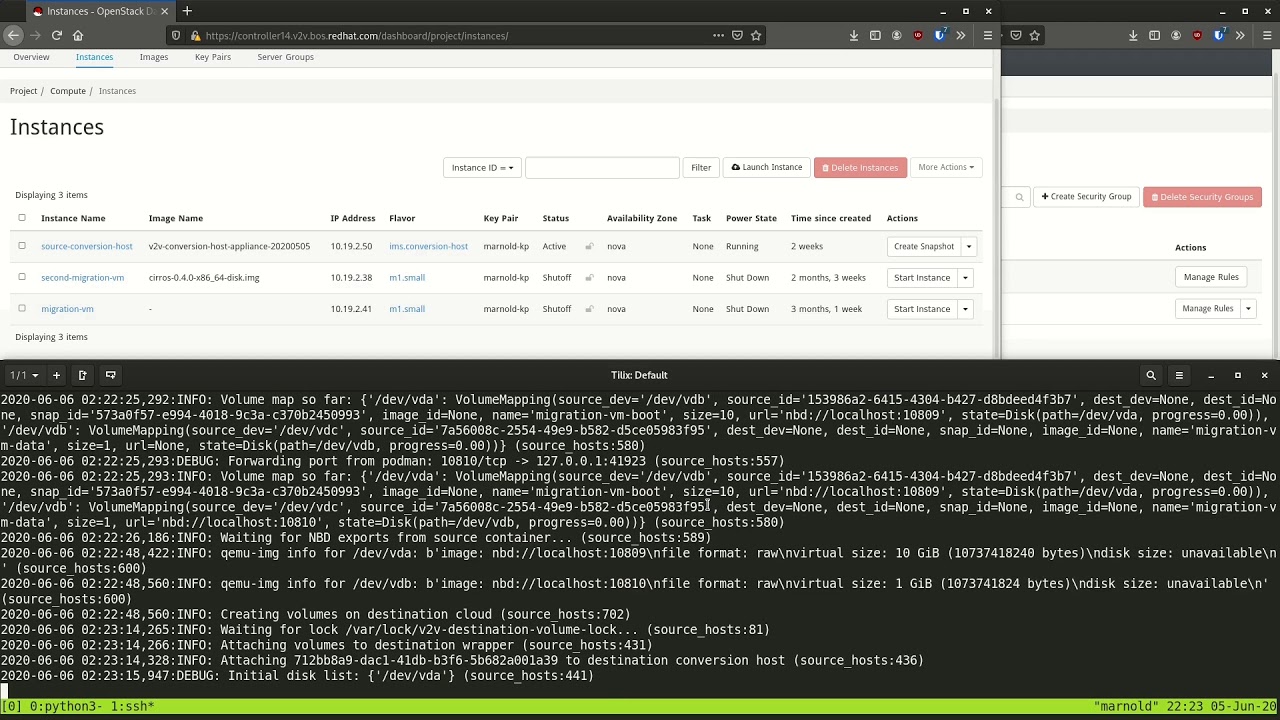
Note that this playbook only extracts metadata about servers in the specified tenant - it does not download OpenStack volumes directly to the migration data directory. Data transfer is handled by the import_workloads playbook. The data is transfered directly between the clouds, meaning both clouds have to be running and reachable at the same time. The following sections describe the process in more detail.
Process Summary
This flowchart illustrates the high-level migration workflow, from a user’s point of view:
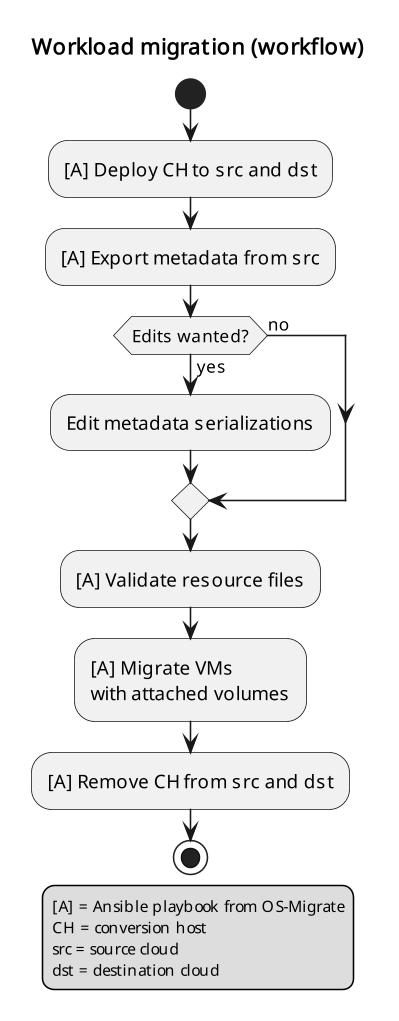
Workload migration (workflow)
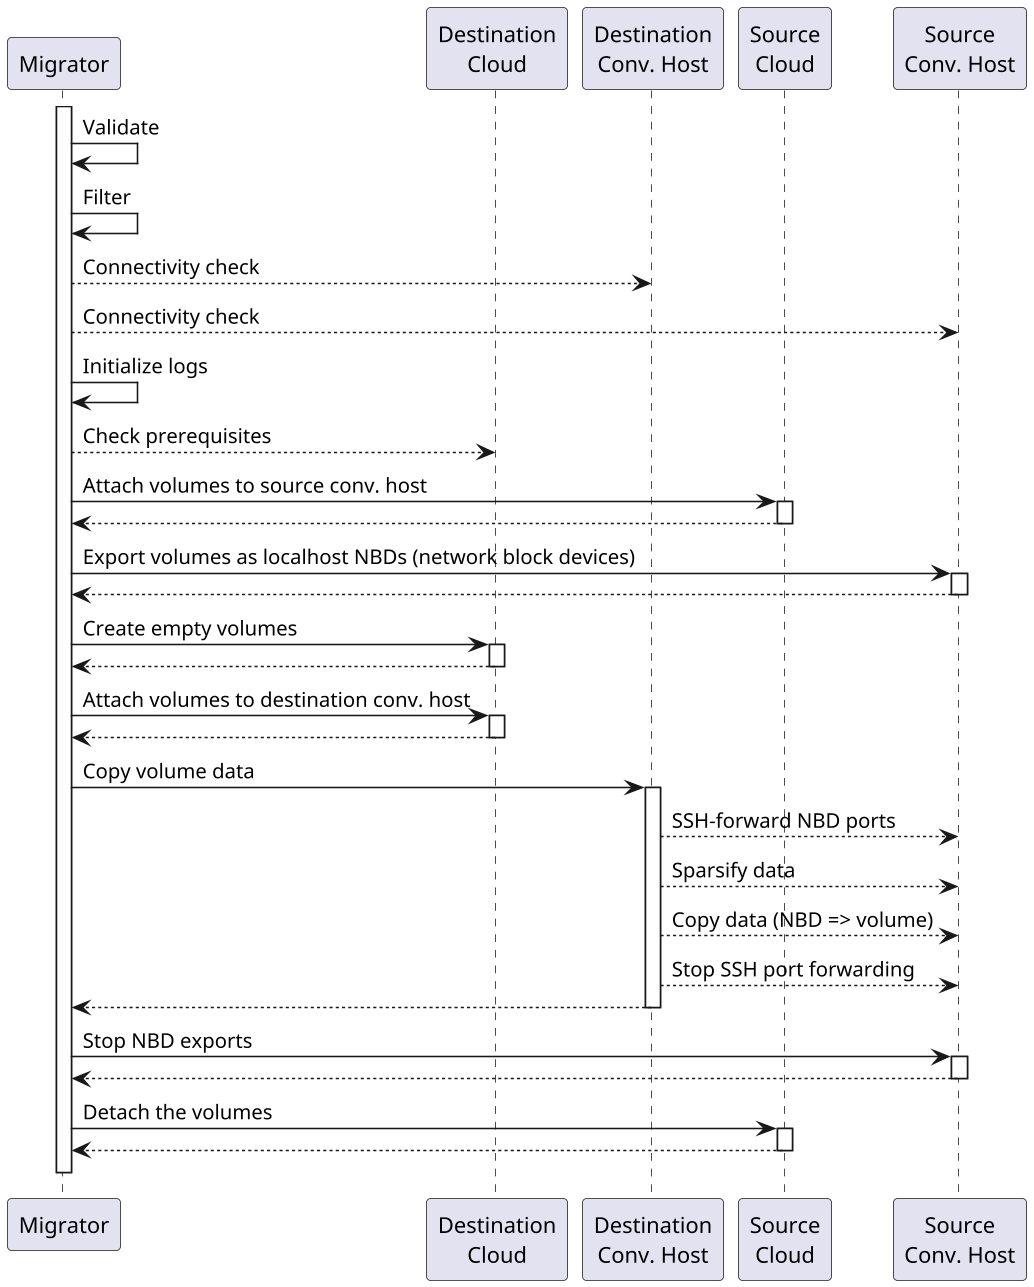
The process involves the deployment of a “conversion host” on source and destination clouds. A conversion host is an OpenStack server which will be used to transfer binary volume data from the source to the destination cloud. The conversion hosts are expected to be created from CentOS 9 or RHEL 8 cloud images.
The following diagram helps explain the need for a conversion host VM:
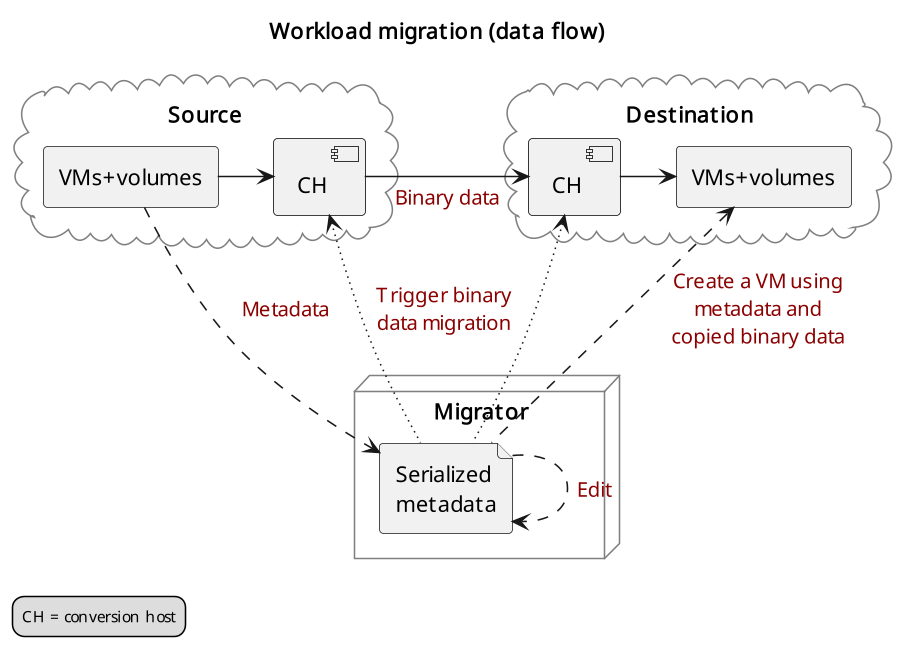
Workload migration (data flow)
This shows that volumes on the source and destination clouds are removed from their original VMs and attached to their respective conversion hosts, and then transferred over the network from the source conversion host to the destination. The tooling inside the conversion host migrates one server by automating these actions on the source and destination clouds:
Source Cloud:
Detach volumes from the target server to migrate
Attach the volumes to the source conversion host
Export the volumes as block devices and wait for destination conversion host to connect
Destination Cloud:
Create new volumes on the destination conversion host, one for each source volume
Attach the new volumes to the destination conversion host
Connect to the block devices exported by source conversion host, and copy the data to the new attached volumes
Detach the volumes from the destination conversion host
Create a new server using the new volumes
This method keeps broad compatibility with the various flavors and configurations of OpenStack using as much of an API-only approach as possible, while allowing the use of libguestfs-based tooling to minimize total data transfer.
Preparation
We’ll put additional parameters into os-migrate-vars.yml:
os_migrate_conversion_external_network_name: public
os_migrate_conversion_flavor_name: m1.large
These define the flavor and external network we want to use for our conversion hosts.
By default the migration will use an image named os_migrate_conv for
conversion hosts. Make sure this image exists in Glance on both clouds.
Currently it should be a
CentOS 9 Cloud Image
or
RHEL 8 KVM Guest Image.
When using RHEL as conversion host, make sure to set the necessary RHEL variables.
Conversion host deployment
The conversion host deployment playbook creates the servers, installs additional required packages, and authorizes the destination conversion host to connect to the source conversion host for the actual data transfer.
$OSM_CMD $OSM_DIR/playbooks/deploy_conversion_hosts.yml
Export
Before migrating workloads, the destination cloud must have imported all other resources (networks, security groups, etc.) or the migration will fail. Matching named resources (including flavor names) must exist on the destination before the servers are created.
Export workload information with the export_workloads playbook. Each server listed in the resulting workloads.yml will be migrated, except for the one matching the name given to the source conversion host server.
$OSM_CMD $OSM_DIR/playbooks/export_workloads.yml
The resulting workloads.yml file will look similar to:
os_migrate_version: 0.17.0
resources:
- _info:
    created_at: '2020-11-12T17:55:40Z'
    flavor_id: cd6258f9-c34b-4a9c-a1e2-8cb81826781e
    id: af615f8c-378a-4a2e-be6a-b4d38a954242
    launched_at: '2020-11-12T17:56:00.000000'
    security_group_ids:
    - 1359ec88-4873-40d2-aa0b-18ad0588f107
    status: SHUTOFF
    updated_at: '2020-11-12T17:56:30Z'
    user_id: 48be0a2e86a84682b8e4992a65d39e3e
  _migration_params:
    boot_disk_copy: false
  params:
    availability_zone: nova
    config_drive: null
    description: osm_server
    disk_config: MANUAL
    flavor_ref:
      domain_name: null
      name: m1.xtiny
      project_name: null
    image_ref:
      domain_name: null
      name: cirros-0.4.0-x86_64-disk.img
      project_name: null
    key_name: osm_key
    metadata: {}
    name: osm_server
    ports:
    - _info:
        device_id: af615f8c-378a-4a2e-be6a-b4d38a954242
        device_owner: compute:nova
        id: cf5d73c3-089b-456b-abb9-dc5da988844e
      _migration_params: {}
      params:
        fixed_ips_refs:
        - ip_address: 192.168.20.7
          subnet_ref:
            domain_name: '%auth%'
            name: osm_subnet
            project_name: '%auth%'
        network_ref:
          domain_name: '%auth%'
          name: osm_net
          project_name: '%auth%'
      type: openstack.network.ServerPort
    scheduler_hints: null
    security_group_refs:
    - domain_name: '%auth%'
      name: osm_security_group
      project_name: '%auth%'
    tags: []
    user_data: null
  type: openstack.compute.Server
Migration parameters
You can edit the exported workloads.yml to adjust desired
properties for the servers which will be created in the destination
cloud during migration. You can also edit migration parameters to
control how a workload should be migrated. Refer to
Migration Parameters Guide
for more information.
Ansible Variables
In addition to the migration parameters in the resource YAML files, you can alter the behavior of OS Migrate via Ansible variables, e.g. to specify a subset of resources/workloads that will be exported or imported. Refer to the Variables Guide for details.
Migration
Then run the import_workloads playbook to migrate the workloads:
$OSM_CMD $OSM_DIR/playbooks/import_workloads.yml
Any server marked “changed” should be successfully migrated to the destination cloud. Servers are “skipped” if they match the name or ID of the specified conversion host. If there is already an server on the destination matching the name of the current server, it will be marked “ok” and no extra work will be performed.
Cleanup of conversion hosts
When you are done migrating workloads in given tenants, delete their conversion hosts via the delete_conversion_hosts playbook:
$OSM_CMD $OSM_DIR/playbooks/delete_conversion_hosts.yml
Demo
Workload migration recorded demo: